Ever thought about diving into the world of resin art? It’s a fun and creative way to unleash your inner artist while making unique pieces for your home or gifts for friends. From funky coasters to dazzling wall art, this list of 30 resin art ideas will inspire you to grab your supplies and get crafting. Whether you’re a complete newbie or have some experience, there’s something here for everyone to try.
Custom Resin Jewelry

Creating custom resin jewelry is a fun and rewarding project you can easily tackle at home. The image showcases a beautiful set that features a pendant and matching earrings, each adorned with colorful, shimmering elements. This type of jewelry not only stands out but also allows for personalization, making it a unique accessory for any outfit.
The vibrant colors and patterns captured in the resin add a playful touch. You can experiment with different shapes and designs, whether it’s a sun motif like the one in the picture or something more abstract. Using glitter, flowers, or even tiny charms can really enhance your pieces and make them one-of-a-kind.
To start, gather your materials: epoxy resin, molds, colorants, and any decorative items you’d like to include. Follow a simple process—mix the resin, pour it into the molds, and let it cure. Once hardened, you can assemble your jewelry with chains or earring hooks. This DIY project allows you to express your creativity while making beautiful gifts or pieces for yourself.
Petri Dish Art

Petri Dish Art is a fun and creative way to explore resin crafting at home. The image shows a vibrant array of colorful resin pieces displayed in petri dishes. Each dish features various shapes and textures, showcasing the limitless possibilities of resin art.
To create your own Petri Dish Art, you’ll need some basic supplies. Gather resin, hardener, color pigments, and any fun embellishments like glitter or small beads. You’ll also need petri dishes to hold your creations. The process is simple: mix the resin and hardener according to the instructions, then add your colors and embellishments. Pour them into the dishes and let them cure for a few hours.
Once cured, these unique art pieces can be used as coasters, decorative displays, or gifts. Experimenting with different colors and textures will help you create something truly special. Have fun, and let your imagination run wild!
Geode-Style Wall Art

Geode-style wall art can bring an eye-catching element to any room. This piece features a beautiful mix of deep blues, vibrant purples, and shimmering golds, mimicking the natural formations of geodes found in nature. The contrast between the colors creates a captivating effect that draws you in.
Creating your own geode wall art is a fun and creative project. You can start with a canvas and use resin to layer different colors. The key is to pour the colors in a way that allows them to blend naturally, just like in a real geode. Using a heat gun or torch can help pop any bubbles that form during the process, ensuring your art has a smooth finish.
Once your piece is dry, you can display it on an easel like this one or hang it on the wall to make a statement. It’s a fantastic way to add a touch of elegance and personality to your living space. Plus, it’s a great conversation starter!
Ocean-Inspired Coasters

Ocean-inspired coasters can bring a touch of beach vibes right into your home. These coasters, featuring beautiful wave designs in shades of blue and white, serve both a practical and decorative purpose.
The vibrant colors mimic the ocean, making them perfect for anyone who loves the sea. Imagine sipping your favorite drink while resting it on a coaster that looks like a swirling wave. It adds a nice flair to your living space!
Creating these coasters at home is an enjoyable project. You can use resin, pigments, and even small shells to enhance the design. The steps are straightforward, and you’ll find that the process is as fun as the final product.
Resin Dipped Wood Bowls

Floral Resin Keepsakes
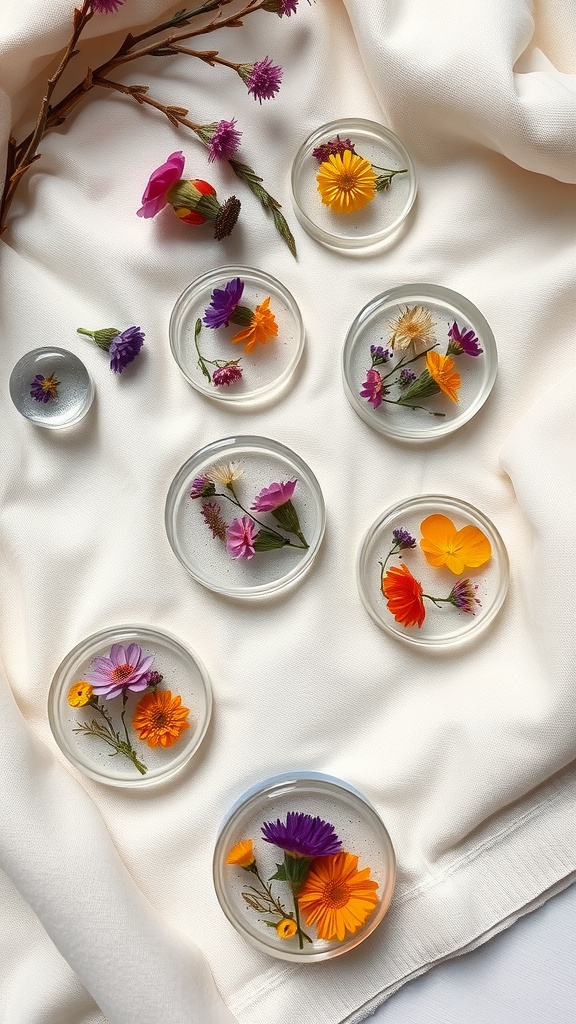
Floral resin keepsakes are a delightful way to preserve the beauty of nature right in your home. The image showcases several round resin coasters, each encapsulating vibrant blooms. The flowers, ranging from deep purples to bright yellows, are beautifully suspended in clear resin, creating a charming display.
This craft not only allows you to keep your favorite flowers for longer but also adds a touch of elegance to your decor. You can easily create these keepsakes using dried flowers, epoxy resin, and silicone molds. Whether you want to commemorate a special occasion or simply appreciate nature’s beauty, these resin pieces can be personalized to reflect your taste.
Gather a variety of dried flowers and follow the steps: mix your resin, pour it into molds, and carefully place your flowers. After letting it cure, you’ll have colorful floral ornaments that brighten up any space!
Resin River Table

Creating a resin river table can be an enjoyable project that adds a unique touch to your home. Imagine a beautiful piece of wood with a vibrant river running through it, made from resin. This type of art combines nature with creativity, resulting in a striking centerpiece for any room.
The image shows a stunning resin river table. The rich, warm tones of the wood contrast beautifully with the bright blue resin that mimics flowing water. The way light hits the surface enhances the colors, making the table feel alive. This visual effect draws attention and invites conversation.
To create your own resin river table, start by choosing a piece of wood that speaks to you. Sanitize the surface and prepare it for the resin. You’ll need epoxy resin, which you can color with pigments to achieve your desired shade. Once mixed, pour the resin into the grooves of the wood, allowing it to flow and settle naturally.
After the resin cures, you can sand and polish the table to achieve a smooth finish. This project not only improves your crafting skills but also results in a custom piece that reflects your style.
Abstract Resin Art Canvas

Creating an abstract resin art canvas is a fun and engaging project that lets you express your creativity. The vibrant colors and fluid designs seen in the image are perfect for both beginners and seasoned artists.
In this piece, swirls of pink, orange, teal, and blue create a dynamic composition that draws the eye. The addition of circular shapes adds depth, mimicking planets or bubbles, giving the art a playful twist. Such patterns can be achieved using different pouring techniques, making the process exciting.
To try this at home, you’ll need epoxy resin, hardener, acrylic paints, and a canvas. Mix the resin according to the package instructions, then blend in your chosen colors. Pour the mixtures onto the canvas, tilt and turn it to create unique designs. Don’t forget to use a heat gun or torch to pop any bubbles!
Once cured, your artwork will be a captivating centerpiece for any room. Plus, every piece is unique, so you can make several canvases for a colorful display.
Marbled Resin Coasters

Marbled resin coasters are not just functional; they’re also a beautiful addition to any home. In the image, you can see a set of coasters featuring rich green swirls accented with golden hues. This stylish design instantly elevates your living space.
Making marbled resin coasters is a fun project you can easily try at home. Start with a clear resin kit, some pigment in your favorite colors, and a silicone mold for the coasters. Mix the resin according to the package instructions and divide it into separate cups for your colors.
Next, pour your colors into the mold. You can swirl them together using a stick to create that marbled effect. Allow your coasters to cure as per the instructions. Once they’re set, you’ll have unique pieces that protect your surfaces while looking chic!
Resin-Infused Paperweights

Resin-infused paperweights are a fun and creative way to bring a little art into your home. These delightful pieces often showcase beautiful flowers or other decorative elements suspended in clear resin, making them not only functional but also visually striking. Picture a lovely petal captured forever in a crystal-clear dome, adding a splash of color to your workspace.
Creating your own resin paperweights is surprisingly easy and requires just a few materials. You’ll need resin, a hardener, and the decorative items of your choice. Common picks include dried flowers, glitter, or even small trinkets. Just mix the resin and hardener according to the instructions, pour a layer into your mold, and then arrange your decorations. After that, add more resin until the mold is full. Let it cure according to the package directions, and soon you’ll have a unique paperweight that reflects your personal style.
These paperweights not only serve a practical purpose but also make for thoughtful gifts. Whether you create them for yourself or as a present, they can brighten up any desk or shelf. Plus, they are a great conversation starter, showcasing your creativity and the beauty of nature trapped in resin.
Glittering Resin Orbs

Glittering resin orbs are a fun and creative way to add a touch of sparkle to your home decor. These little spheres are filled with colorful glitters and beads, creating a vibrant and playful look. The image showcases a collection of these orbs, reflecting light and colors in a captivating manner.
Making your own resin orbs is quite simple. You’ll need epoxy resin, glitter in various colors, and round molds. Start by mixing the resin according to the package instructions. Once mixed, add your desired amount of glitter to the resin. Pour the mixture into the molds, making sure to leave some space at the top. Allow them to cure completely before removing them from the molds.
These orbs can be used in many ways. You might place them in a decorative bowl, use them as paperweights, or even incorporate them into other crafts. The possibilities are endless when it comes to creating your own unique designs!
Resin Flower Pots

Resin flower pots are a fun and creative way to bring color and personality to your garden or indoor space. The vibrant hues of blue, yellow, and red seen in this image make these pots stand out beautifully, drawing attention to the cheerful flowers they hold.
Making your own resin flower pots can be an enjoyable project. You can start by mixing epoxy resin with pigments to create your desired colors. Once mixed, pour the resin into silicone molds shaped like pots. After a few hours, you’ll have a colorful pot that not only holds plants but also adds a decorative touch to your home.
These pots are not just pretty; they’re also durable and weather-resistant, making them ideal for outdoor use. You can choose to add various designs or even embed flowers or leaves in the resin for a unique look. With a little creativity, your resin flower pots can become a focal point in your garden.
Resin-Embedded Keychains

Creating resin-embedded keychains is a fun and creative way to express yourself. The image shows a unique keychain shaped like a light bulb, filled with colorful pieces such as numbers and other decorative elements. This small piece can be a reflection of your personality or a perfect gift for a friend.
To make your own resin keychain, you’ll need a few materials: clear resin, a mold (like a light bulb shape), decorative items (like stickers, glitter, or small charms), and a keychain ring. Start by preparing your resin according to the package instructions. Once mixed, pour it into the mold and add your decorative items. Let it cure completely, then attach it to the keychain ring.
These keychains are not only practical but also serve as little pieces of art. Every time you grab your keys, you’ll get a little smile from your custom creation!
Colorful Resin Bookmarks

Resin bookmarks are a fun and creative way to add a personal touch to your reading experience. These bookmarks can be made using colorful flowers and vibrant hues, making each piece unique. The image showcases two beautiful resin bookmarks resting on an open book, surrounded by bright yellow flowers. The bookmarks feature pressed flowers, which add a natural element that’s both striking and delicate.
Making your own resin bookmarks is easier than you might think. You’ll need some basic supplies like clear resin, a mold, and your choice of decorative elements such as dried flowers or glitter. Simply mix the resin according to the instructions, pour it into the mold, and carefully arrange your flowers before letting it set. In just a few hours, you’ll have a charming bookmark that reflects your style.
These colorful resin bookmarks not only help keep your place but also make lovely gifts for friends and family who share your love for reading. You can even customize them with personal touches, like initials or small charms. With a little creativity, you can create bookmarks that are as beautiful as the stories they help tell.
Resin and Wood Serving Tray

If you’re looking to add a touch of creativity to your hosting game, a resin and wood serving tray is a fun project to try. This combination of materials results in a beautiful piece that’s both functional and decorative.
The image shows a stunning wooden tray featuring smooth, flowing lines and contrasting colors. It holds a variety of snacks and drinks, showcasing how versatile and stylish this tray can be. You can see a cocktail garnished with a slice of lemon, alongside an array of tasty treats.
Creating your own resin and wood serving tray is simple. Start with a wooden base, which can be shaped however you like. Then, mix resin with pigments to achieve your desired color. Pour the resin into the crevices of the wood for a striking effect. Once cured, you’ll have a unique tray ready for entertaining!
Imagine serving appetizers or cocktails to guests on a tray that you made yourself. It’s a conversation starter and adds a personal touch to any gathering. Plus, it’s a great way to showcase your creativity and skills!
Sparkling Resin Wall Clock

Creating a sparkling resin wall clock is a delightful project that adds a unique touch to your home decor. Imagine a clock where colorful resin bubbles surround the numbers, bringing brightness and charm to any room. The image shows a round clock with a clear resin edge and vibrant, translucent bubbles in shades of orange, pink, and blue. The contrast between the bubbles and the clean white face makes it visually appealing.
This DIY craft is not just fun; it’s also practical. You’ll have a functional clock that doubles as a piece of art. To get started, you’ll need resin, a clock mechanism, and some decorative elements like glitter or small beads. Mix the resin as per the instructions, pour it into a mold, and carefully arrange your decorations before letting it cure.
The result is a sparkling piece that reflects your personality and creativity. Plus, you can customize the colors and shapes of the bubbles to match your style. This project is perfect for crafters at any skill level and makes for a great gift, too!
Resin Pet Portraits

Resin pet portraits are a delightful way to capture the likeness of your furry friends. The image shows an array of resin sculptures that resemble various dog breeds, all beautifully encased in clear resin boxes. Each piece reflects the unique personality of the pets, making them perfect keepsakes.
Creating your own resin pet portrait can be a fun project. You can start by selecting a high-quality photo of your pet. Next, you’ll need some resin, a mold, and any decorative items you want to include, such as glitter or small toys. Mix the resin according to the instructions and pour it into the mold. Then, place your pet’s photo inside and let it cure. In no time, you’ll have a charming piece of art that showcases your beloved pet!
Not only are these resin portraits visually appealing, but they also make for heartfelt gifts for fellow pet lovers. Imagine surprising a friend with a resin sculpture of their dog. It’s a personal touch that shows you care. Plus, you can customize the background colors and other elements to match their pet’s unique style.
Resin Art Coffee Table

Creating a resin art coffee table is a fun project that can add a unique touch to your living space. This coffee table showcases a beautiful blend of colors, like turquoise and earthy tones, creating a striking visual effect. The resin creates a glossy finish, making the tabletop look like a piece of art.
To get started, you’ll need some epoxy resin, pigments, and a table base. Mix the resin according to the instructions, and then add your chosen colors. Pour the mixture onto the tabletop, allowing it to flow and mix naturally for a stunning design.
After pouring, let the resin cure completely. This can take several hours or even days, depending on the product used. Once it’s set, you’ll have a one-of-a-kind coffee table that not only serves a purpose but also sparks conversation among guests.
Enhancing your living room with a resin art coffee table is an enjoyable way to express your creativity. Plus, it’s a project that you can customize to match your decor!
Resin and Stone Garden Decorations

Creating a charming garden space can be a delightful project. Using resin and stone decorations adds a unique touch to your outdoor area. In the image above, we see a collection of whimsical figures surrounded by lush foliage and smooth stones. These little sculptures can bring life and personality to any garden.
The figures displayed seem to be made from a clay-like material, carefully crafted to evoke a sense of playfulness. They interact with their natural surroundings, enhancing the overall aesthetic. You can easily incorporate similar pieces into your garden by crafting them yourself using resin and molds.
To make your own resin figures, start by gathering materials such as resin, pigments, and molds. You can pour colored resin into molds shaped like animals or abstract forms. Once they cure, you can arrange these pieces among stones and plants, just like in the image. This creative process not only allows for customization but also adds a personal touch to your outdoor decor.
Don’t forget to mix in various sizes and colors of stones to complement your resin creations. This mix creates visual interest and depth in your garden. As you develop your own resin and stone decorations, you’ll find endless possibilities for expression and creativity.
Unique Resin Phone Cases

Resin phone cases are a fun way to express your creativity while protecting your device. They allow you to blend colors, add textures, and incorporate unique elements that reflect your personality. The image showcases a phone case featuring a captivating design with a castle against a vibrant orange moon, surrounded by swirling clouds and delicate flowers.
Creating a resin phone case is simpler than you might think. Start by gathering your materials: epoxy resin, a silicone mold, and any decorative items you wish to include, like glitter or dried flowers. Mix the resin according to the package instructions, and pour it into the mold.
Once the resin is in place, you can add your decorative elements. In the case shown, bold colors and intricate designs make for a striking look. After everything is arranged, let the resin cure completely. The result is a personalized phone case that not only looks great but also offers a layer of protection.
These unique creations not only stand out but also make for fantastic gifts. You can customize them for friends or family members by choosing designs that resonate with their interests. So grab your materials and let your imagination run wild!
Resin-Infused Candles

Resin-infused candles combine the charm of warm light with the beauty of nature. Imagine a cozy space filled with the flickering glow of candles, each uniquely designed with colorful resin embedded within. This DIY project allows you to express your creativity while also adding a personal touch to your home decor.
To start making your own resin-infused candles, gather the supplies. You’ll need candle wax, wick, essential oils for fragrance, and, of course, resin along with any decorative elements like dried flowers. Begin by melting the wax and mixing in the essential oils. Once it reaches the right temperature, carefully pour it into your candle molds.
Before the wax completely sets, add your resin and flowers to create a stunning visual effect. You can layer the wax and resin to achieve different looks. Allow everything to cool and harden completely before you remove the candles from the molds. Light them up, and enjoy the soft glow they bring to your space!
Resin Art Table Numbers

Using resin art for table numbers is a fun way to add a personal touch to any event. Imagine colorful, eye-catching numbers that not only serve a purpose but also enhance the overall decor. In the image, you can see vibrant numbers arranged neatly on a beautifully set table, surrounded by lovely floral arrangements. This combination makes for a welcoming atmosphere.
Creating your own resin table numbers is quite simple. Start by gathering your materials: resin, silicone molds for the numbers, color pigments, and any decorative elements like glitter or dried flowers. Mix the resin and pigments, pour them into the molds, and let them cure. Once they’re set, you can easily pop them out and display them on your tables.
These resin numbers can be customized to fit any theme or color scheme. Whether it’s a wedding, birthday party, or any special occasion, they can be tailored to match perfectly. Plus, they can serve as keepsakes for guests to remember the event.
So why not give it a shot? Resin art table numbers are not just functional; they’re also a creative project that adds flair to your celebrations.
Rainbow Resin Suncatchers

Rainbow resin suncatchers are a fun and colorful addition to any home. These cheerful decorations not only brighten up your space but also create beautiful light displays as the sun hits them. Hanging in a window, they catch the light and fill the room with vibrant colors.
Making your own suncatchers is quite simple. You’ll need some clear resin, various colors of pigment, and a mold in the shape of a rainbow. Mix the resin according to the package instructions and pour it into the mold layer by layer, adding different colors for each arch of the rainbow. Once cured, you can add hooks and chains to hang them by your window.
As seen in the image, the suncatchers feature a lovely blend of colors, surrounded by sparkling beads that enhance their charm. When sunlight filters through, the suncatchers create a warm, inviting atmosphere. It’s a delightful way to welcome a bit of nature into your home!
Resin-Embedded Magnets

Creating resin-embedded magnets is a fun and creative project that can brighten up your fridge or any magnetic surface. In the image, you can see colorful, playful letters that are typical of the types of magnets people love to use for notes and reminders. These magnets can be personalized with various designs, colors, and even embedded items like flowers or glitter.
To make your own resin-embedded magnets, start with some silicone molds, epoxy resin, and small decorative items you want to include. Mix the resin according to the package instructions, pour it into the molds, and then add your chosen decorations. Once it’s cured, attach a magnet to the back, and you’ll have a unique piece of art to showcase.
This project is not only enjoyable but also allows you to express your personality. Plus, they make great gifts for friends and family. So grab your supplies and start creating some fun resin-embedded magnets!
Resin Art Jewelry Boxes

Creating resin art jewelry boxes is a fun and engaging way to add a personal touch to your storage. The image showcases a beautifully crafted box, adorned with colorful gems and a lovely design. It’s not just a storage solution; it’s also a piece of art that can enhance your decor.
To make your own resin jewelry box, start with a clear resin and a silicone mold in your desired shape. You’ll also need some decorative elements like dried flowers, glitter, or gems, just like the ones seen in the image. Mix the resin according to the package instructions and pour it into the mold, adding your decorations as you go.
Once the resin hardens, you’ll have a stunning box to store your jewelry. Not only is this a creative project, but it also results in a unique piece that can be gifted or kept for yourself. Don’t forget to experiment with colors and shapes to make your box truly one-of-a-kind!
Textured Resin Wall Panels
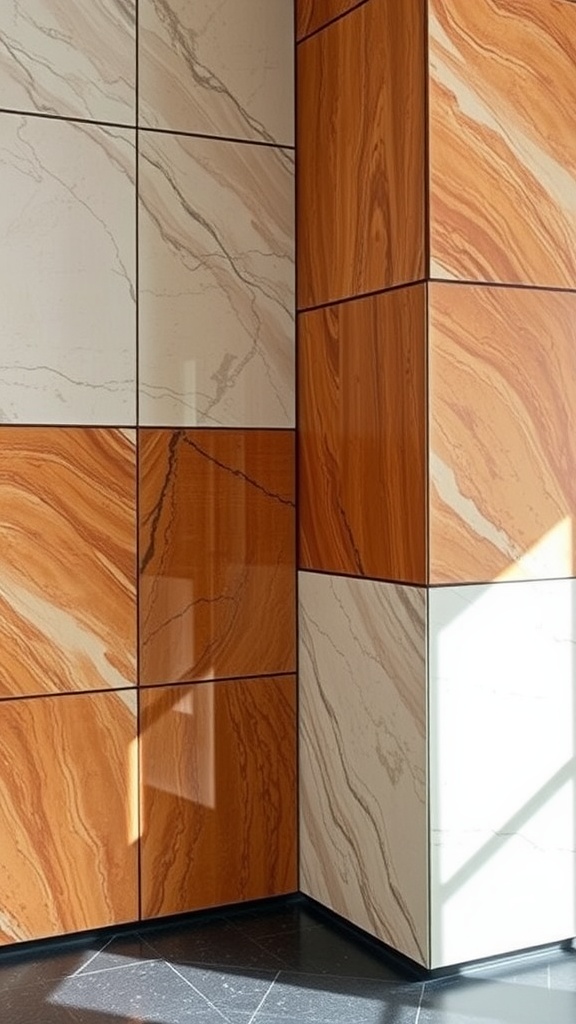
Textured resin wall panels are a fun way to add some character to your space. They can mimic the look of natural materials like marble or wood, giving your walls a unique touch without the hefty price tag.
In the image, you can see a striking combination of orange and cream tones. The panels are arranged in a way that creates visual interest, showcasing the natural swirls and patterns typical of resin art. This design can easily brighten up a room and serve as a great conversation starter.
Creating your own textured resin wall panels is doable at home! Start with a smooth surface and choose your colors. Mix your resin and hardener according to the package instructions. Pour the resin onto your surface and use tools like a spatula or brush to create textures. Let it cure, and soon you’ll have your own wall art that’s not only beautiful but also a reflection of your creativity.
Resin-Infused Charcuterie Boards

Resin-infused charcuterie boards are a fun and creative way to elevate your hosting game. Imagine a beautifully crafted wooden board, enhanced by colorful resin designs that catch the eye and spark conversations. The image showcases a stunning arrangement of cheeses, cured meats, and fresh fruits, all perfectly displayed on a round wooden platter. The vibrant colors of the food contrast beautifully with the rich brown of the wood, creating a feast for the senses.
To make your own resin-infused charcuterie board, start by gathering materials. You’ll need a wooden board, food-safe resin, and a variety of meats, cheeses, and accompaniments. First, prepare your board by sanding it down and ensuring it’s clean. Next, mix the resin according to the package instructions, and pour it into any desired shapes or designs on the board. Once the resin has cured, arrange your delicious selections on top, mixing textures and flavors for a delightful experience.
Don’t forget the finishing touches! Fresh herbs, like rosemary or thyme, can add a nice aromatic touch. With some creativity, your charcuterie board will not only be a treat for the palate but also a visual delight at any gathering.
Resin and Metal Wall Art

Resin and metal wall art combines creativity with a touch of modern style. In the image, you can see a beautiful piece that features dark, twisted branches against a soft blue background. The use of resin adds depth, while the metal elements give it a strong presence.
This artwork plays with textures and colors, creating a calming yet striking visual. The white flowers on the branches bring a hint of nature indoors, making it feel fresh and inviting. The rocky base adds an earthy touch, grounding the piece and enhancing its overall aesthetic.
Creating your own resin and metal wall art can be a fun project. Start by gathering your materials: resin, metal pieces, and a canvas. Plan your design, and then mix the resin according to the instructions. Pour it onto your canvas and arrange the metal elements as you like. Allow it to cure, and soon you’ll have a unique piece that reflects your personal style!
Resin Art Plant Holders

Creating resin art plant holders is a fun and creative way to showcase your favorite plants. The image shows a couple of unique planters that blend beautifully with greenery. Each pot features smooth lines and a stylish design, making them perfect for any room.
To make your own resin plant holders, you’ll need epoxy resin, a silicone mold, and color pigments. Start by mixing the resin according to the package instructions. Once mixed, add your chosen pigments to create the desired color.
Pour the resin into the mold carefully, allowing it to settle and take shape. You can even add leaves or small flowers to enhance the look. After the resin has cured, pop it out of the mold, fill it with soil and a plant, and watch how it brightens up your space.
These plant holders not only serve a practical purpose but also add an artistic touch to your home. They can be customized to fit your style, making them a great addition to your decor. Plus, making them can be a delightful project to tackle over the weekend!
Resin Art for Home Decor

Resin art can elevate your home decor in ways you might not expect. Take a look at a piece that embodies the beauty of resin art. It showcases a vibrant blue and teal color palette, mimicking the calming waves of the ocean. The textures and layers in this art piece draw the eye, making it a stunning focal point for any living room.
Imagine this artwork hanging above a cozy, neutral sofa. The soft cushions and textured throw pillows complement the art perfectly, creating a harmonious balance in the space. The round coffee table adds a modern touch, while the earthy materials give warmth to the room. This setup can inspire you to create your own resin art masterpiece for your home.
Creating your own resin art is simple! All you need are some epoxy resin, pigments, and a canvas. Mix the resin with your chosen colors, and pour them onto the canvas, letting them flow and mix naturally. The results can be as unique as the piece in the image. With a little practice, you can infuse your personal style into your decor in a fun and creative way.