If you’re looking to unleash your creativity without breaking the bank, you’ve come to the right place! “Dollar Store Hacks: 15 Genius Crafts for Under $5” offers simple yet clever DIY projects that you can tackle using just affordable finds from your local dollar store. Get ready to transform everyday items into fabulous crafts that add a personal touch to your home or make delightful gifts for friends and family!
Customized Coasters Using Cheap Tiles
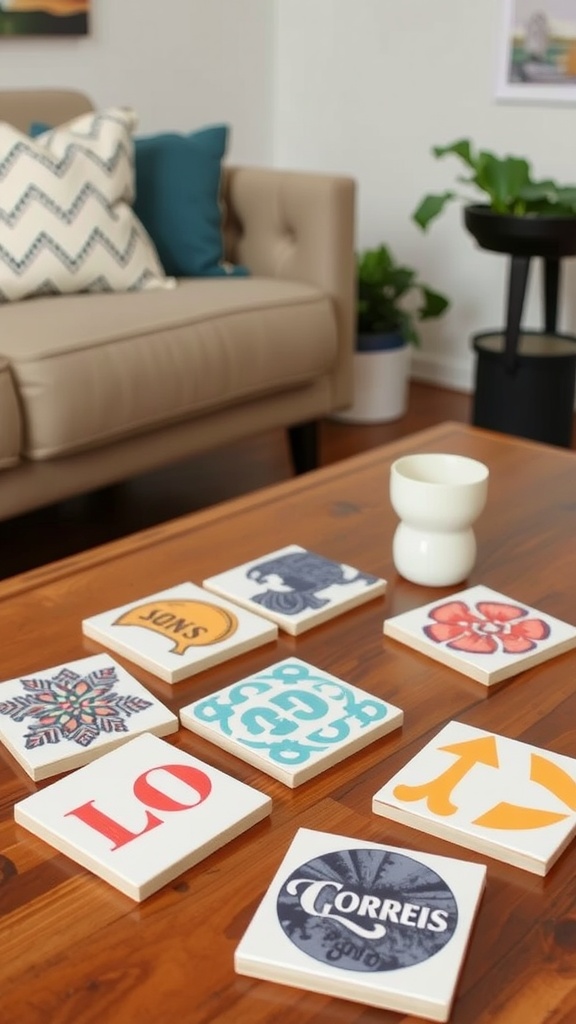
One of the easiest and most enjoyable crafts is making customized coasters using inexpensive tiles. You can find basic ceramic tiles at your local dollar store, and they work perfectly for this project. The tiles serve as a blank canvas, allowing you to unleash your creativity.
In the image, you can see a collection of coasters featuring various designs and colors. Each one adds a unique touch to any living space. Using tiles not only makes for an affordable craft, but it also provides a functional piece for your coffee table.
To create your coasters, all you need are ceramic tiles, Mod Podge or glue, and some decorative paper or fabric. Cut the paper to fit the tile, apply the glue, and seal with a coat of Mod Podge for durability. Let them dry, and you’ll have personalized coasters that reflect your style!
Upcycled Glass Jars as Decorative Storage

Upcycling glass jars is a fun and easy way to add some charm to your home while keeping things organized. The image above shows a variety of glass jars, each with its own unique color and shape, all tucked neatly within a wooden cabinet.
Using these jars for storage not only declutters your space but also gives you a stylish display. You can store anything from kitchen staples like pasta and grains to craft supplies or office items. Just imagine how pretty a collection of colorful jars can look lined up on a shelf!
To get started, gather your empty jars and give them a good wash. You can leave them clear or paint them to match your decor. Labeling them can also add a personal touch. Use chalkboard paint or adhesive labels for a quick update. These jars are versatile and can fit any room in your house.
Decorative Storage Bins from Cardboard Boxes

Transforming old cardboard boxes into decorative storage bins is a fun and budget-friendly project. This idea is perfect for anyone looking to add some charm to their space without breaking the bank. You can create stylish and functional storage solutions that fit right into your home decor.
To start, gather your cardboard boxes. These can be from old deliveries or even from the dollar store. Next, grab some paint, wrapping paper, or fabric to cover the boxes. You can choose colors and patterns that match your personal style. A simple coat of paint can turn a plain box into something eye-catching.
Once you’ve decorated your boxes, arrange them creatively in your space. Stack them on each other or place them in a corner for a cozy look. Not only do they help keep your items organized, but they also serve as unique decor pieces. Add labels for extra organization, or leave them as is for a more casual vibe.
This DIY project is not just affordable; it’s also a great way to recycle materials that would otherwise be tossed out. It’s a simple craft that packs a punch in terms of function and style. So grab those boxes and let your creativity shine!
Transforming Dollar Store Frames into Gallery Wall Art

Creating a gallery wall doesn’t have to break the bank. With dollar store frames, you can easily transform your space into a personalized art showcase. The picture above illustrates a collection of frames in varying styles and colors, arranged neatly on a wall. The mix of black-and-white images offers a cohesive yet interesting look.
Start by picking up a few frames from your local dollar store. Look for different shapes and finishes to create visual interest. Whether you prefer natural wood tones or classic black and white, there’s something for everyone.
Next, choose your art. You can print your own photos, download free prints online, or even use pages from old books or magazines. The key is to select images that resonate with you. Arrange your chosen pieces on the floor first to find a layout that feels balanced.
Once you’re happy with the arrangement, hang the frames on the wall. This step is crucial, so take your time. Don’t hesitate to adjust the spacing until it feels right. The finished product will be a gallery wall that reflects your style, all for under $5 per frame!
Crafting Fun Centerpieces with Balloons

Balloon centerpieces can transform any table into a festive gathering spot. With just a few dollars, you can create delightful decorations that bring joy to any occasion. The image shows a bright arrangement featuring colorful balloons in shades of green, blue, orange, and yellow, paired with vibrant flowers in a glass vase.
To make your own balloon centerpieces, start by picking a mix of balloon colors that suit your theme. Inflate the balloons and secure them to a sturdy base, like a flower arrangement. This not only looks inviting but also adds height and excitement to your table setting.
Consider adding some greenery or flowers around the base to create a cohesive look. The combination of balloons and flowers, as seen in the image, gives a cheerful vibe that’s perfect for parties. You can even personalize the balloons with messages or themes related to your event!
Overall, crafting balloon centerpieces is an easy way to add a touch of fun and creativity to your decor while keeping costs low.
DIY Candle Holders from Plastic Cups

Looking for a fun and budget-friendly craft? These DIY candle holders made from plastic cups are just the ticket! This simple project not only brightens up your home but also gives new life to items you might otherwise throw away.
The image shows three adorable candle holders created from clear plastic cups, each decorated with playful designs. You can see a happy face, a lion, and some cheerful fruit motifs. They each hold a small candle, which adds a warm glow, creating a cozy atmosphere.
To make your own, grab some plastic cups from the dollar store, along with paint, brushes, and candles. Start by painting fun designs on the cups. You can choose anything from simple patterns to cute characters. Once the paint dries, place a candle in each cup. Light them up, and let the soft light shine through the designs!
This craft is perfect for parties or just to add some charm to your living space. Plus, it’s a great way to involve kids in a creative project. They’ll love personalizing their own candle holders!
Whimsical Planters from Dollar Store Baskets

Transforming dollar store baskets into whimsical planters is a simple and fun way to bring some greenery into your space. These planters, made from inexpensive baskets, add a unique touch to your home or garden. With just a few steps, you can create a lively display that showcases your favorite plants.
Start by selecting your baskets. Look for ones with interesting weaves and textures, as these will add character to your planters. Once you have your baskets, line them with a plastic liner or a trash bag to keep the soil from leaking out. This step is essential to maintain the integrity of the basket and to keep things tidy.
Next, fill the bottom of your lined basket with a bit of gravel for drainage, followed by potting soil. Choose plants that thrive in your environment; herbs, succulents, or colorful flowers work well. Remember to leave some space at the top for watering.
Place your new planters in sunny spots or shaded areas, depending on the plants you chose. These charming baskets can be displayed on porches, patios, or even indoors. Not only do they look appealing, but they also bring life to your surroundings without breaking the bank.
Wreath Making with Dollar Store Supplies

Wreath making is a fun and creative way to add a personal touch to your home. Using supplies from a dollar store, you can create stunning wreaths without spending much. Just take a look at the vibrant wreath in the image! It’s a lively mix of colors and flowers that brighten up any door.
To make a similar wreath, start with a basic foam or wire frame, which you can find for under $2. Next, gather faux flowers in different shades that catch your eye. The flowers in the picture include reds, yellows, and whites, creating a cheerful vibe. Don’t forget some greenery to fill any gaps and add depth to your design.
Once you have your materials, use a hot glue gun to attach the flowers and greenery to the frame, layering them for a fuller look. This project is perfect for beginners and can be customized for different seasons or occasions. With just a little effort, you’ll have a door decoration that looks like it came from a boutique, all for under $5!
Charming Wall Art from Dollar Store Stickers

Transform your space with creative wall art made from dollar store stickers! This simple and fun project allows you to use an array of colorful stickers to express your personality and style.
The image shows a vibrant collection of stickers in various shapes, sizes, and colors. Each sticker brings a unique flair, making it easy to mix and match for a personalized look. You can find stickers that fit themes like nature, travel, or even playful designs that will brighten any room.
To start, gather a selection of stickers that catch your eye. You can place them directly on a blank canvas or even stick them to a wall. Arrange the stickers in a way that creates balance and visual interest. Don’t be afraid to overlap them or layer different designs for a more dynamic appearance.
This project not only adds charm to your home but also allows you to showcase your creativity without breaking the bank. With just a few dollars, you can create a delightful piece of art that reflects your unique style.
Making Playful Gift Bags with Craft Paper

Creating your own gift bags can be a fun and budget-friendly project. Look at these delightful bags featuring cute reindeer designs. They’re perfect for any occasion, especially during the holidays!
Start with some basic craft paper from the dollar store. You can pick up rolls or sheets in different colors and patterns. The festive designs add a personal touch that store-bought bags often lack.
To make your bags, cut the paper into rectangles and fold them into a bag shape. Secure the sides with tape or glue. Then, add handles using simple ribbon or twine. Don’t forget to embellish your bags with some fun stickers or handwritten tags!
These playful gift bags are not just for presents. Use them for party favors or as decorative storage. Plus, they are a great way to get crafty without breaking the bank. So grab your supplies and let your creativity shine!
DIY Jewelry Organizers from Biscuit Tins

If you’re looking for a simple and budget-friendly way to organize your jewelry, using biscuit tins is a clever option. The image shows a beautifully repurposed tin that’s perfect for hanging necklaces and other accessories.
The design features hooks that hold various chains and pendants, keeping them untangled and easy to find. This method is not only practical but adds a decorative touch to your space. Plus, biscuit tins can often be found at dollar stores or thrift shops, making this craft cost-effective.
To create your own jewelry organizer, start by selecting a biscuit tin that appeals to you. Next, drill small holes near the top edge of the tin to attach hooks. Hang your necklaces and enjoy the neatness! This project is an example of how something simple can bring order to your jewelry collection.
DIY Holiday Ornaments from Clear Plastic Balls

Creating holiday ornaments from clear plastic balls is a fun and budget-friendly craft that anyone can enjoy. These ornaments are customizable, allowing you to express your creativity while adding a personal touch to your holiday decor.
In the image, you can see a delightful assortment of ornaments filled with festive goodies. Each clear ball showcases unique decorations, like tiny teddy bears, colorful presents, and cheerful snowmen. This variety makes the ornaments visually appealing and perfect for hanging on your tree.
To make your own ornaments, gather some clear plastic balls, which you can easily find at a dollar store. Next, choose small items like glitter, faux snow, or miniature figures to fill them with. You can also use ribbons and stickers to add extra flair. Simply open the plastic balls, fill them up, and then close them securely. You can hang these cheerful decorations using a string or ribbon.
This craft is not only fun for adults but also a great activity for kids. They can help choose the items to fill the balls, sparking their creativity and excitement for the holiday season. Plus, making these ornaments together can create lasting memories.
Personalized Magnets Using Craft Foam

Personalized magnets are a fun and easy craft project that anyone can enjoy. Using brightly colored craft foam, you can create unique magnets that reflect your personality or make great gifts for friends and family.
In the photo, you can see a collection of colorful foam letters stuck to a fridge. These letters are perfect for personalizing your space or sharing messages with loved ones. You can find craft foam sheets at your local dollar store for just a few bucks, making this an affordable project.
To make your own personalized magnets, start by cutting the craft foam into fun shapes or letters. You can use cookie cutters as guides or freehand it if you’re feeling creative. Once you have your shapes, simply attach a small magnet to the back using hot glue or adhesive. Let them dry completely before placing them on your fridge.
This creative project allows you to express yourself while also keeping your important notes and reminders in view. Plus, it’s a fantastic way to keep kids entertained and engaged with a crafty activity.
Creating Fun Photo Booth Props

Setting up a photo booth at your next gathering? It’s easier than you think! With a few supplies from the dollar store, you can create fun photo booth props that everyone will love. The image shows a lively group of friends posing with colorful props, making the moment even more memorable.
Start with some simple items like cardstock, colored paper, and wooden sticks. These can be transformed into must-have props such as silly glasses, funny hats, or even cute animal faces. Just grab your scissors and some glue – the crafting process is part of the fun!
Consider adding some playful signs for guests to hold up. You can use phrases like “Selfie Time!” or “Say Cheese!” to bring that extra touch. With just a few dollars spent, you’ll have a photo booth that keeps the smiles coming. Everyone will want to snap a picture with your creative designs!
Unique Gift Wrapping Ideas with Fabric Scraps

When it comes to wrapping gifts, using fabric scraps can really make your presents stand out. The image shows some creative examples of how to use these materials to add a personal touch to your gifts.
The wrapped gift in the center is beautifully adorned with a shiny ribbon that complements its festive design. Surrounding it are unique fabric-wrapped creations, like the red and gold package that resembles a traditional basket. These items showcase how simple fabric can be transformed into charming gift wraps.
Using fabric scraps is not only economical but also eco-friendly. You can take leftover pieces from other projects or even thrift store finds. Simply wrap your gift in the fabric, tie it up with twine or ribbon, and you’ve got a delightful surprise. It’s a fun way to get creative and give your gifts a special flair.
Don’t forget to add some natural elements, like pine cones and greenery, to enhance the aesthetic even more. These small details can really elevate your gift presentation. So next time you have a gift to wrap, think about those fabric scraps and let your creativity shine!
Creating Cozy Pillows from Dollar Store Towels

Transforming dollar store towels into cozy pillows is a fun and budget-friendly project. With just a few simple steps, you can create unique decorative pieces for your home.
Start by selecting towels in colors and patterns you love. The image shows a vibrant red checkered pillow paired with a soft blue and white pillow featuring playful letters. These contrasting designs add personality to any space.
To make your pillows, fold the towel in half and stitch the sides together, leaving one end open. Turn it inside out, fill it with a soft stuffing, and sew the open end shut. You can even add embellishments like fabric letters or patches to personalize your pillows further.
This project costs under $5 and will brighten up your living area. So grab some towels, and let your creativity flow!
Crafting Colorful Keychains with Beads

If you’re looking for a fun and easy craft, making colorful keychains with beads is a fantastic option. This simple project can be done with supplies from the dollar store, keeping your budget in check. The image shows a vibrant assortment of keychains, each uniquely designed with a range of colorful beads.
Start by gathering your materials. You’ll need some keychain rings, a variety of beads, and stretchy string or thin wire. The mix of colors and shapes makes the keychains not only functional but also playful. You can even personalize them with initials or charms.
To create your keychain, cut the stretchy string to your desired length. Then, begin threading your beads onto the string. Arrange them in any order you like. Once you’ve reached the end, secure the beads by tying a knot or using a crimp bead. Attach your keychain ring, and voila! You have a custom keychain.
DIY Bath Bombs from Dollar Store Ingredients

Making your own bath bombs at home is not only simple but also super fun! The image shows a collection of bath bombs, with soft pastel colors creating a relaxing vibe. These cute little spheres are perfect for adding a splash of color and fragrance to your bath.
You can easily find all the ingredients you need at your local dollar store, making it a budget-friendly project. For this DIY, you will need baking soda, citric acid, Epsom salt, essential oils, and a few coloring options. Don’t worry if you can’t find everything; feel free to get creative with the scents and colors!
To make your bath bombs, start by mixing 1 cup of baking soda, 1/2 cup of citric acid, and 1/2 cup of Epsom salt in a bowl. Then, add a few drops of essential oils for that lovely scent. You can also mix in some food coloring if you want to brighten them up. Once mixed, pack the mixture tightly into a mold and let them dry for a day or two. When you’re ready to pamper yourself, just drop one into your bath for a fizzy, relaxing experience!
Making Fun Wall Calendars with Poster Boards

Creating a wall calendar can be both functional and stylish, and it doesn’t have to break the bank. Using simple poster boards, you can whip up a colorful calendar that brings a pop of joy to your wall.
The calendar in the image showcases an orange poster board with a clear grid layout. Each day of the week is marked, making it easy to jot down important dates and reminders. This visual appeal ensures that you won’t forget those upcoming events!
To get started, gather your materials from the dollar store. All you need are poster boards, markers, and possibly some decorative stickers. Choose a color that speaks to you, and let your creativity flow!
First, draw the grid on your poster board with the markers. Make sure to leave space for each day of the week. Once you have the layout, fill in the numbers and important dates. You can even customize it by adding themes for different months or seasons.
For added organization, consider using colored paper to create tags or notes that can hang beside the calendar. This makes it easy to keep track of tasks or special events at a glance. Plus, it adds to the overall look!
This DIY project is perfect for hanging in any room. It keeps you on track while also serving as a cute piece of decor. Get your supplies, gather some friends, and make crafting your calendar a fun group activity!
Crafting Unique Table Centerpieces from Dollar Store Finds

Creating a stunning table centerpiece doesn’t have to break the bank. With just a few items from the dollar store, you can craft something that looks elegant and festive. The image showcases a beautifully arranged centerpiece featuring candles, greenery, and decorative elements that set the mood for any gathering.
Start with a simple base like a round tray or a vase. Gather faux flowers, holiday ornaments, and some greenery, all easily found at your local dollar store. In this example, tall candles are placed in the center, surrounded by vibrant red roses and shiny baubles. This mix of textures and colors adds depth to your arrangement.
To add extra flair, consider using branches or twigs. They can be arranged to create height and visual interest. The natural elements combined with the festive decorations make for an inviting centerpiece that sparks conversation. Don’t forget to match your color scheme to your dining setup for a cohesive look!
With just a few simple steps and items, you can transform your dining table for any occasion. Get creative and let your personality shine through in your designs. Each piece can tell a story, making your table not just a place to eat, but a space to celebrate.
Creating Seasonal Decor with Foam Shapes

Foam shapes are a fun and affordable way to bring some seasonal cheer into your home. Whether it’s for Christmas, Halloween, or any festive occasion, these lightweight materials can be transformed into delightful decorations without breaking the bank.
In the image, you can see a cozy entryway adorned with various foam shapes. The vibrant green trees and colorful candles add a playful touch to the space. It’s amazing how simple shapes can create such a warm and inviting atmosphere, perfect for welcoming guests during the holiday season.
To make your own seasonal decor, start by picking up foam shapes from your local dollar store. You’ll find trees, stars, and even fun characters like snowmen and Santas. All you need are some craft supplies like paint, glitter, and glue to customize them. Let your creativity run wild!
Once decorated, arrange these foam shapes around your home. They can be placed in front of your door, on your mantel, or even as centerpieces on your dining table. Not only do they look great, but they also add a personal touch to your holiday celebrations.
Fun DIY Pet Toys from Dollar Store Supplies

Making your own pet toys can be a fun and rewarding experience. The pets in the image look eager and playful, surrounded by a collection of colorful DIY toys. These toys, made from simple supplies found at a dollar store, can provide hours of entertainment for your furry friends.
Using items like foam balls, fabric scraps, and even small household items, you can craft unique toys that suit your pets’ play styles. For instance, the foam balls in the image are safe for chewing and come in various sizes, making them perfect for dogs of all breeds.
To create your own toys, consider using materials like rope for tug toys or felt for soft chew items. A quick trip to the dollar store can stock you up on supplies without breaking the bank. Not only will your pets love their new toys, but you’ll also enjoy the satisfaction of making them yourself.
Personalized Notebooks from Dollar Store Notebooks

Creating personalized notebooks is a fun and simple way to add a touch of your personality to everyday items. The image shows a vibrant assortment of notebooks, each with its own unique design and color scheme. You can easily transform plain dollar store notebooks into something special with just a few materials.
Start by gathering your supplies. You’ll need notebooks from the dollar store, some colorful pens, stickers, and perhaps some decorative paper. The variety of notebooks in the picture illustrates how you can mix and match colors and styles to suit your taste. Each notebook has its own charm, whether it’s the sleek black design or the bright pink cover.
Next, get creative! Use stickers to add your favorite quotes or patterns. You can also cut out shapes from decorative paper and glue them onto the covers. The notebooks shown in the image highlight the effectiveness of this simple process. Personalizing your notebooks not only makes them visually appealing but also gives you a sense of ownership and pride.
Don’t forget to label your notebooks too! You can write your name or the purpose of the notebook on the front. This makes it easy to keep track of your notes or sketches. By following these simple steps, you’ll end up with a collection of notebooks that are uniquely yours and perfect for staying organized.
Creating Colorful String Art with Dollar Store Supplies

Making string art is a fun and creative project that you can easily tackle with supplies from your local dollar store. The vibrant colors in the image evoke a sense of cheer and creativity, making it the perfect inspiration for your own string art piece.
For this craft, all you need are some colorful strings, wooden letters or shapes, and a base to attach everything to. The bright pink, yellow, and orange strings stand out beautifully, creating a dynamic background that draws the eye. Using dollar store materials, you can create a unique piece of art without spending much.
Start by choosing a word or shape you want to feature. The letters in the image are bold and white, which contrasts nicely with the colorful strings. Next, secure your base—this could be a canvas, a piece of wood, or even cardboard. Then, attach your letters or shapes using glue.
Now, for the fun part: wrapping the colorful strings around nails or pins that you’ve placed in your base. You can create patterns or simply let the strings crisscross for a more abstract look. Don’t worry about making it perfect; the charm of string art lies in its playful nature.
In just a few easy steps, you can transform simple materials into a bright and cheerful piece of art that will liven up any space. Plus, it’s a great activity to do with friends or family!
Stylish Table Runners from Dollar Store Fabrics

Creating a stylish table runner can be a fun and budget-friendly way to spruce up your dining area. Using fabrics from the dollar store, you can easily transform your table without breaking the bank. Imagine walking into your dining room and seeing a beautiful table runner that adds a touch of elegance to your space.
The image shows a lovely table set with a floral patterned runner in navy and white. This design brings a bit of charm to the wooden table, making it feel warm and inviting. Pairing it with a soft blue fabric underneath creates a layered effect that enhances the overall look.
Making your own table runner is simple! Just pick a few fabric pieces from the dollar store that catch your eye. Measure your table, cut the fabric to size, and sew or glue the edges to prevent fraying. You can even get creative by combining different patterns and colors for a more personalized touch.
This project is a perfect example of how you can achieve a stylish home decor look for under $5. It’s perfect for special occasions or everyday use. Plus, it’s a great way to express your creativity while keeping costs low!
DIY Garden Markers with Paint Sticks

Transforming your garden can be as simple as making some colorful DIY garden markers. These markers, crafted from paint sticks, are not just functional but also add a splash of color to your green space. The image shows a delightful array of markers in various colors, poking out of the soil amidst blooming flowers. Each marker is uniquely labeled, making it easy to identify what’s planted where.
To make these markers, you only need a few supplies that you can easily find at a dollar store. Grab some wooden paint sticks, acrylic paint, and a permanent marker. You can personalize each stick with the name of the plant or herb you’re growing. It’s a fun way to keep your garden organized.
Start by painting the sticks in bright colors that contrast nicely with the soil and plants. After the paint dries, use the marker to label each stick clearly. Once completed, stick them into the ground next to your plants. This simple project not only helps you remember what you planted but also adds a cheerful vibe to your garden.
Crafting Holiday Table Settings with Paper Plates

Setting a festive table doesn’t have to cost a fortune. With just a few paper plates and some creative flair, you can transform your dining experience without breaking the bank. The image shows a beautifully arranged table, perfect for holiday gatherings.
In the photo, you see vibrant paper plates adorned with cheerful designs. Layering different sizes adds depth to your table settings. The checkered pattern and floral accents bring a cozy, rustic vibe, making it ideal for holiday meals.
To create a similar look, start with a neutral tablecloth or runner, just like the one in the image. Then, pick your favorite paper plates from the dollar store. Mixing patterns can bring an extra touch of charm.
Finish your settings with simple decorations, such as candles and greenery. The candles in the center of the table, surrounded by holiday-themed elements, create a warm atmosphere. A few sprigs of pine or berries can enhance the seasonal feel.
Using paper plates not only simplifies cleanup but also allows for easy customization. Try personalizing each setting with guests’ names written on the plates. This adds a thoughtful touch to your holiday gathering.
Upcycling Old T-Shirts into Tote Bags

Turning old t-shirts into tote bags is a fun and easy craft that anyone can do. The image above shows a creatively transformed t-shirt displaying the words ‘DOLLAR STORE’ in bold colors. It’s a perfect example of how you can give new life to clothing that might otherwise go to waste.
Upcycling is not only a way to save money, but it also helps reduce waste. Plus, you end up with a unique tote bag that reflects your personality. You can use this bag for grocery shopping, carrying books, or as a stylish accessory.
To get started, grab an old t-shirt and follow these simple steps: First, cut off the sleeves and the collar. Then, turn the shirt inside out and sew the bottom hem closed. If you don’t have a sewing machine, fabric glue works just fine! Finally, turn the shirt right side out, and you have your very own tote bag!
It’s a delightful way to showcase your creativity while being eco-friendly. Plus, the materials cost little to nothing, making this craft a fantastic addition to your list of dollar store hacks.
Making Simple Wall Hangings with Twine

Wall hangings can add a cozy touch to any room, and making your own is a fun way to express creativity without breaking the bank. Using twine from the dollar store, you can create beautiful pieces that serve as focal points in your home.
Take a look at the image above. It features two lovely wall hangings made from twine, each with a unique design. The natural tones and textures bring warmth to the space, making it feel inviting and stylish. You can easily replicate this look with just a few materials.
Start by gathering your supplies: twine, scissors, and a wooden dowel or branch for hanging. For added flair, you might want to include beads or decorative elements that catch your eye. Begin by cutting lengths of twine and tying them to the dowel in various patterns or knots. Don’t worry about making it perfect; the beauty of DIY is in its imperfections!
Once you’re happy with the design, hang your creation on the wall. This simple project not only beautifies your space but also gives you a sense of accomplishment. Plus, it’s a wonderful way to spend a rainy afternoon or a lazy weekend. The best part? You can do it all for under $5!
So grab your twine and get crafting. You’ll be amazed at how such a small investment can transform your home decor!
Creating Unique Bookmarks from Dollar Store Materials

Bookmarks are essential for any book lover, but they don’t have to be boring or expensive. Using materials from the dollar store, you can create fun and unique bookmarks that reflect your personality. The image shows a variety of bookmarks made with simple supplies that can easily be found.
Each bookmark in the picture is crafted from basic items like craft sticks, felt, and some colorful embellishments. The designs range from playful animals to festive stars, showcasing how easy it is to let your creativity shine. You can personalize your bookmarks in a way that speaks to you, adding bits and pieces that you love.
To get started, gather your materials from the dollar store. Look for craft sticks, felt sheets, markers, and any other fun decorations. The process is simple: cut the felt into shapes, decorate the craft sticks, and glue everything together. With just a few dollars, you can make several bookmarks that not only hold your place but also brighten your reading experience.