If you think creating eye-catching 3D paper crafts requires a ton of skill and complicated techniques, think again! In this guide, we’ll explore a variety of fun and simple projects that might look intricate but are surprisingly easy to put together. So grab your scissors, glue, and some colorful paper, and let’s dive into the world of 3D paper crafting!
Whimsical Paper Trees

Creating whimsical paper trees is a delightful way to add charm to your home decor or craft projects. These trees, bursting with vibrant autumn colors, look intricate but are surprisingly easy to make.
The image captures a serene landscape with three paper trees showcasing rich reds and yellows. The playful design elements, like the scattered leaves and cheerful flowers, invite creativity. You can imagine how fun it would be to create these and perhaps even use them for a seasonal display!
To make your own paper trees, gather some colorful cardstock, scissors, and glue. Start by cutting out the trunk shapes and leaf patterns. Layering the leaves will give your trees depth and character. Add details like smaller bushes and rocks to finish your nature scene.
These paper trees are not just for decoration; they’re also perfect for kids’ craft projects. They encourage imaginative play and can easily brighten up a room. So go ahead, give it a try, and let your creativity flow!
Layered Geometric Shapes

Layered geometric shapes offer a fun and creative way to add depth to your paper crafts. In the image, you can see various three-dimensional shapes like cubes, pyramids, and hexagons. These shapes can be made from simple paper but look like they belong in a gallery.
To create these eye-catching designs, you don’t need advanced crafting skills. Start with some basic materials: colored paper, scissors, and glue. Cut out shapes of different sizes and stack or arrange them as you like. You can mix colors and shapes to craft something truly unique.
The beauty of layered geometric shapes is in their simplicity. You can easily transform flat paper into dynamic pieces of art. Whether you’re decorating a wall or creating table centerpieces, these shapes add a modern touch.
The process is enjoyable and relaxing, making it perfect for an afternoon project. Grab your supplies, unleash your creativity, and you’ll be surprised at how quickly you can create your own geometric masterpiece!
Intricate 3D Paper Flowers

Creating 3D paper flowers can be a delightful way to brighten up your space. These flowers, vibrant and detailed, might look complicated, but the truth is, they are quite simple to make!
The image showcases an array of colorful blossoms, each with unique shapes and textures. From bold reds to soft pinks and yellows, these paper flowers can transform a dull corner into a lively one. The layers in each flower add depth, making them appear almost lifelike.
To get started, you’ll need some colored paper, scissors, a glue stick, and a bit of patience. Cut out petal shapes and layer them to create dimension. Don’t forget to add some green leaves for contrast, just like in the image. It’s all about playing with colors and shapes!
Once you have your flowers assembled, consider using them as table centerpieces or wall decorations. They can add a personal touch to any occasion, from parties to quiet afternoons at home. So grab your supplies and start crafting!
Beautiful Paper Stars

Creating beautiful paper stars is a fun and simple craft that anyone can enjoy. These stars add a charming touch to any space, making them perfect for decorations at home or for special occasions.
The image showcases a delightful arrangement of stars in various colors, including white and warm tones. Hanging them at different lengths gives the display a playful feel. This technique is easy to replicate, allowing you to customize your own starry sky.
To make these paper stars, you only need a few materials: colorful paper, scissors, a ruler, and a glue stick. Start by cutting your paper into the desired shapes and dimensions. Then, fold and glue them together to form the star structure. It’s a straightforward process that results in stunning decorations.
Once your stars are complete, you can hang them from the ceiling or create a mobile for a nursery. Their three-dimensional look makes them stand out, and you’ll be surprised by how impressive they turn out.
Creative Paper Snowflakes

Creating paper snowflakes is a classic craft that can add a touch of winter wonder to your home. The image showcases an array of beautifully crafted snowflakes, each unique in its design. They look intricate and complex, but the truth is, they’re quite simple to make!
To get started, all you need is some paper, scissors, and a little imagination. You can use plain white paper or get fancy with patterned or metallic paper for an extra pop. Start by folding the paper into a triangle, then keep folding until you have a smaller triangle. This technique is what helps create those lovely symmetrical designs.
Next, it’s time to cut! You can snip away at the edges and create shapes that appeal to you—think stars, curves, or even little holes. When you unfold your creation, you’ll be surprised by the beauty that emerges. Don’t be afraid to experiment with different sizes and patterns!
These paper snowflakes can be hung from the ceiling, used as table decorations, or even stuck on windows. They’re perfect for all ages, making them a fun family activity during the colder months. So grab your supplies and let your creativity flow!
Charming Paper Animals

If you’re looking for a fun and simple way to brighten up your space, crafting paper animals is a delightful option. In the image, you see a playful scene featuring a couple of foxes and a rabbit, all made from colorful paper. These cute critters bring a sense of whimsy and creativity to any room.
Creating these charming paper animals doesn’t require expert skills. Just gather some colorful paper, scissors, and glue. Start by cutting out the shapes needed for each animal. The foxes have bright orange and white parts, while the rabbit is a soothing gray. Once you’ve cut everything out, just fold and glue the pieces together, bringing your adorable friends to life!
To add to the scene, you can craft some vibrant flowers and trees from the same paper. Scatter some colorful confetti around them for a cheerful touch. These paper animals can be used as decorations for a child’s room, a party centerpiece, or even as a playful gift. So grab your supplies and let your imagination run wild!
Elegant Paper Butterflies

When it comes to paper crafts, paper butterflies are a delightful choice that adds charm to any space. These colorful creations can easily transform a simple room into a whimsical haven. With just a few materials, you can make beautiful butterflies that look meticulously crafted but are surprisingly simple to create.
Imagine a scene with vibrant butterflies fluttering against a bright blue sky, each one showcasing a unique blend of colors. The best part? You don’t need advanced skills to achieve this look. Just some colored paper, scissors, and a bit of glue will do the trick!
To start your butterfly-making journey, select a variety of colored papers. Think about shades that complement each other, like fiery oranges and soft pinks. Cut out butterfly shapes using templates for uniformity, or let your creativity run wild and design your own. Once cut, fold the wings gently to create a 3D effect. A dab of glue in the center secures it all together.
These paper butterflies can be used in various ways. Decorate your walls, create a mobile for a nursery, or even add them to gift wrap for a personal touch. The options are endless! With each butterfly you make, you’ll see how easy it is to fill your space with beauty and personality.
Stylish Paper Gift Boxes

Creating your own gift boxes can be a fun and crafty way to add a personal touch to your presents. The image showcases a delightful collection of paper gift boxes in various sizes and designs, all beautifully wrapped and topped with lovely bows.
Each box features a unique pattern, from stripes to geometric prints, making them visually appealing. By using colorful paper, you can easily customize these boxes for any occasion. Whether it’s a birthday, holiday, or just a surprise gift, these stylish boxes make your presents stand out.
Making these boxes is simpler than you might think. All you need is some sturdy paper, scissors, and a bit of glue. Start by cutting the paper to your desired size, fold it into the shape of a box, and secure the edges. Don’t forget to add a ribbon for that extra flair!
These paper gift boxes can also serve as decorations in your home. Stack them up on a shelf or use them as centerpieces during celebrations. They bring a cheerful vibe without much effort.
So go ahead, gather your supplies and get crafting! You’ll impress your friends and family with these chic, handmade gift boxes that look complicated but are truly easy to make.
Chic Paper Wall Art

Creating chic paper wall art can be a fun and rewarding project. The image showcases a playful arrangement of elements such as mountains, clouds, and a cozy house, all crafted from paper. This design has a warm and inviting feel, making it perfect for brightening up any space.
The layered look of the mountains adds depth to the artwork. By using different shades of paper, you can easily achieve a similar effect. The clouds in the background provide a light and airy touch, while the wooden house adds a charming focal point.
To recreate this style, gather some colored paper, scissors, and glue. Start by cutting out the shapes of the mountains and clouds. Layer them for a three-dimensional effect. You can also add words or phrases like ‘Letten and words’ to personalize your piece. This project is simple but can transform your wall into a creative statement.
Adorable Paper Dolls

Creating paper dolls is a delightful way to express creativity without breaking the bank. These charming little figures can be made from simple materials you likely already have at home, such as colored paper, scissors, and markers.
In the image, you can see a lineup of colorful paper dolls, each dressed in unique outfits that showcase different styles. From playful overalls to elegant dresses, these dolls are easy to customize, letting you design an outfit for every personality.
To make your own adorable paper dolls, start by sketching your designs. Once you have a look you like, cut out the shapes and assemble them. Adding fun details, like patterns or accessories, can really bring your dolls to life.
These paper dolls are not just fun to make; they also provide hours of imaginative playtime. You could even create a themed set, like festivals or seasons, to make your craft sessions even more engaging. So grab your supplies and let your creativity run wild!
Fun Paper Dinosaurs

Creating paper dinosaurs can be a delightful experience, especially when they come to life in your hands. This image showcases a vibrant scene filled with colorful dinosaurs made from paper, set against a playful backdrop of trees and mountains.
The bright yellow dinosaur stands proudly in the center, surrounded by a group of its friends, each one uniquely shaped and colored. The blue and green hues of the other dinosaurs add to the fun atmosphere. These paper crafts are surprisingly simple to make, often requiring just some basic supplies like colored paper, scissors, and glue.
Begin by choosing your favorite dinosaur shapes. You can find templates online or even sketch your own. Cut out the pieces carefully, and then fold or curve them to create a three-dimensional effect. Don’t be afraid to mix colors and patterns to make your dinosaurs truly unique!
Once you have your dinosaurs ready, consider adding some extra elements to the scene. Create simple trees and mountains from paper, just like you see in the image. This adds depth and makes the whole project feel more complete. The end result is a lively, fun diorama that showcases your creativity.
Delicate Paper Lanterns

Paper lanterns are a delightful addition to any space, bringing a warm and inviting glow. They seem intricate, but the truth is, you can create these charming decorations with just a few simple steps.
The image showcases a collection of beautifully crafted paper lanterns in various shapes and sizes, all illuminated softly. The gentle light they emit creates a cozy atmosphere, perfect for any occasion. Imagine these hanging in your living room or at a special event!
To make your own delicate paper lanterns, start with colorful paper, scissors, and a bit of glue. Cut the paper into your desired shape, add some folds or designs, and assemble everything together. Hang them up, and watch how they transform your space.
These lanterns can be tailored for any season or celebration. Use pastel colors for spring or bold hues for a festive gathering. The best part? You can customize them to fit your personal style!
Colorful Paper Pinwheels

Colorful paper pinwheels are a bright and cheerful addition to any garden or outdoor space. They twirl and spin in the breeze, bringing a sense of joy and playfulness. The variety of colors—pink, yellow, blue, and orange—adds a lively touch to the scenery. Each pinwheel stands tall, almost like a small, vibrant flower, creating a whimsical landscape that captures attention.
Making these pinwheels is simple and requires just a few materials. You’ll need colorful paper, scissors, a ruler, a pencil, a pushpin, and a straw or wooden stick for the base. Start by cutting a square piece of paper, then mark the center and cut slits towards the corners. Fold the corners toward the center, secure them with a pushpin, and attach it to your stick. It’s a fun project for kids and adults alike!
These pinwheels can also be used as decorations for parties or events. Set them up in clusters to create an eye-catching display. You can customize their colors to fit any theme, making them versatile for any occasion. Plus, watching them spin is a soothing sight that can brighten up even the dullest day.
Stunning Paper Mason Jar Decor

If you’re looking to brighten up your space with a touch of creativity, these paper mason jar decorations are just the thing. They look intricate but are surprisingly simple to make. Using just a few materials, you can create a charming centerpiece that adds warmth to any room.
The image showcases three mason jars filled with beautiful paper flowers. The flowers come in soft shades of pink, giving the jars a lovely, inviting appearance. Each jar sits on a rustic wooden table, which complements the natural vibe of the decor.
To create your own version, start by gathering some supplies: mason jars, colored paper or craft foam for the flowers, green stems, and floral tape. Cut out flower shapes from the paper and layer them to form your blooms. Attach them to the stems and arrange them in the jars. It’s a fun and rewarding crafting project!
One of the best parts about this decor is that you can customize it as much as you like. Try different colors for the flowers and even add little tags to the jars for a personal touch. These decorations can be used for special occasions or simply to bring a bit of cheer into your everyday life.
Impressive Paper 3D Maps
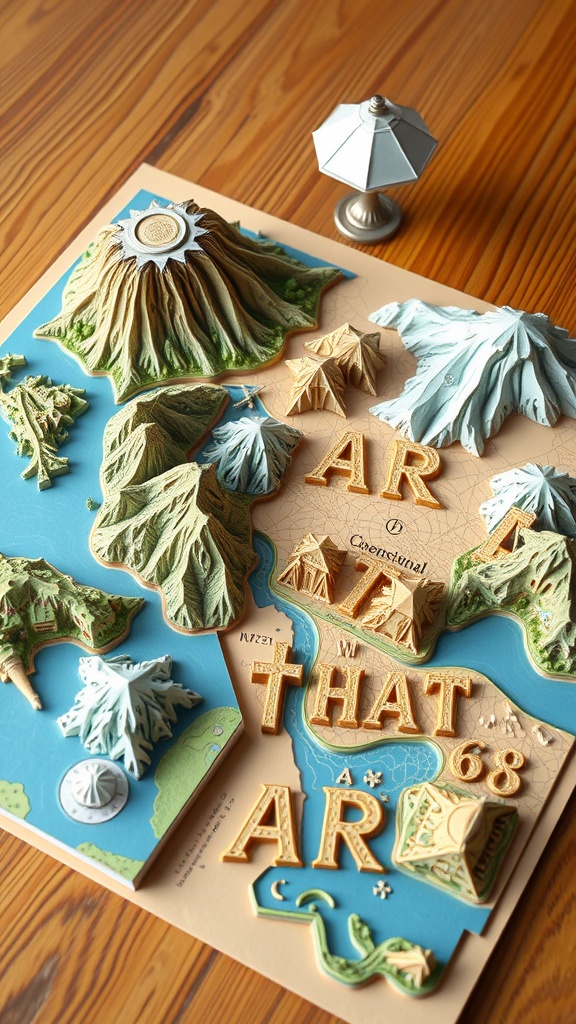
3D paper maps can transform a simple piece of paper into an engaging display. The image shows a colorful map featuring mountains, trees, and various terrains. Each layer adds depth, creating a dynamic visual experience.
These maps don’t just look good; they also serve as a fun project to dive into. You can choose your favorite locations and create a personalized map. Gather your supplies like colored paper, scissors, and glue to start crafting.
To make one, begin by sketching your map layout. Cut out different shapes for mountains and trees in various colors. Layer them on top of each other to achieve a 3D effect. Finally, add labels or symbols to represent landmarks. This simple process can yield impressive results!
Charming Paper Banners

If you’re looking to add a splash of color and fun to any celebration, charming paper banners are just the way to go. These eye-catching decorations can transform a plain room into a festive space in no time.
The image above showcases delightful paper banners strung across a room, featuring bright colors and playful designs. You’ll find letters, stars, and cheerful graphics that instantly lift the mood. Each banner tells a story, making it perfect for birthdays, parties, or any special occasion.
Creating your own paper banners is easy and involves just a few simple steps. Start by cutting out triangles from colorful paper, adding letters or designs with markers or stickers. Then, string them together with twine or ribbon, securing each piece with mini clothespins. Hang them up, and watch how they bring a smile to everyone’s face!
These banners not only look festive but are also a fun craft project you can do with kids. It’s a wonderful way to engage their creativity while making something beautiful for your next gathering!
Creative Paper Planes

Paper planes are not just for kids; they’re a delightful craft for all ages! In this image, you can see a colorful swarm of paper planes soaring against a bright blue sky. The vibrant reds and yellows create a cheerful scene that instantly catches the eye.
Making your own paper planes can be a fun afternoon activity. All you need is some colorful paper and a little creativity. Start with a simple design, like the classic dart or a glider, and experiment with different shapes and sizes to see how they fly.
Don’t worry if your plane doesn’t take off perfectly on the first try. Adjustments to the wings or body can significantly change its flight. Plus, it’s a fantastic way to explore the principles of aerodynamics in a hands-on way!
Artful Paper Quilled Designs

Paper quilling is a delightful craft that transforms simple strips of paper into beautiful designs. The image showcases a vibrant scene filled with colorful birds, flowers, and trees, all crafted using this technique. The intricate details make it look complicated, but you’ll find that it’s quite manageable.
With just a few materials, you can create your own version of this art. Start with quilling paper strips in various colors, a slotted tool for rolling, and a glue stick. The design in the image features bold colors and layered elements, which you can easily replicate by playing with different shapes and sizes.
Begin by making the birds and flowers. Roll strips into tight circles for the flower centers and use teardrop shapes for petals. For the birds, simple shapes like triangles and circles can form their bodies. Don’t forget to add leaves and branches for a complete look.
When you’re ready to assemble, lay out your pieces on a background. This allows you to experiment with placements before gluing them down. The final touch will be to add some smaller details, like tiny flowers and stars, to fill in spaces and create depth.
Unique Paper Jewelry

Making paper jewelry is a fun and creative way to showcase your artistic side. The image features some beautifully crafted paper earrings, each with its own unique design. The intricate patterns and shapes can easily catch anyone’s eye while being light and comfortable to wear.
Using simple materials, you can create stunning pieces that look like they took hours to make. The two pairs of earrings displayed highlight different styles—one with a delicate lace-like design and the other in a charming heart shape. These designs can be easily achieved with a little patience and some basic crafting supplies.
To start making your own paper jewelry, gather supplies like colorful cardstock, scissors, a glue stick, and earring hooks. Cut your paper into different shapes, layer them for depth, and attach them to the hooks. With a bit of creativity, you can customize these pieces to match any outfit or occasion.
Not only is this a fun craft, but it also makes for thoughtful gifts. Friends and family will appreciate the effort and creativity that goes into each piece. So, gather your supplies and start crafting some unique paper jewelry that stands out!
Thoughtful Paper Cards
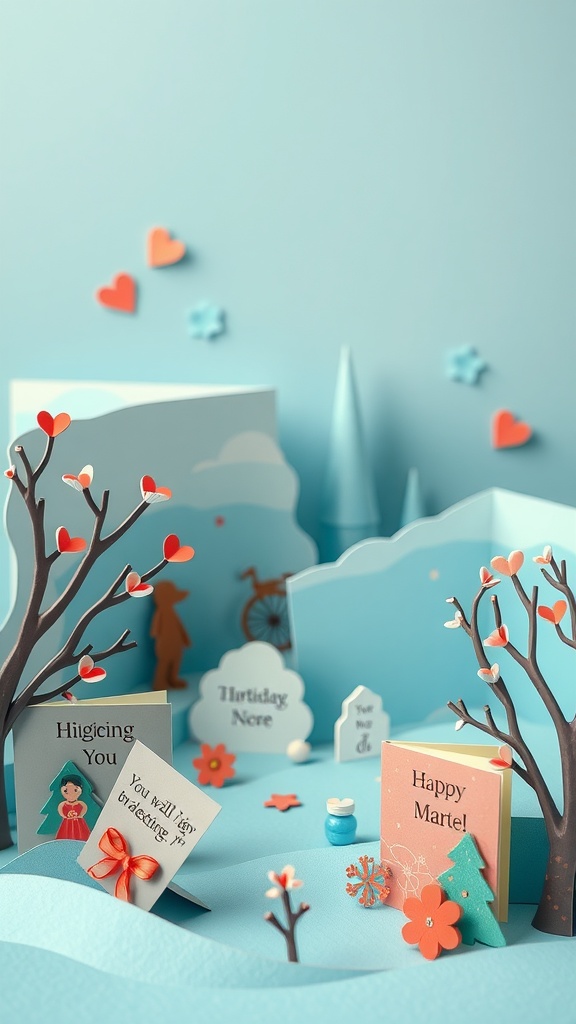
Creating thoughtful paper cards can be a delightful way to express your feelings. The image showcases a charming 3D card scene, filled with playful elements that add depth and personality. Each detail, from the tiny trees to the colorful hearts, invites creativity into the crafting process.
The layered textures and colors in this design make it appear intricate, yet it’s surprisingly simple to assemble. You can easily replicate this look at home. Just gather some cardstock, scissors, and glue. With a bit of folding and cutting, you can design your own unique card that will surely bring smiles.
Add personal messages or little drawings inside to make your card even more special. Whether it’s a birthday or just a cheerful greeting, these cards can brighten anyone’s day. Plus, they’re a fun way to get kids involved in crafting!
Elegant Paper Wreaths

Lively Paper Monsters

Get ready to unleash your creativity with these lively paper monsters! These fun characters are perfect for adding some joy to your crafting projects. With their bright colors and quirky shapes, they’re sure to bring a smile to anyone who sees them.
Making paper monsters is easier than you might think. Just gather some colorful paper, scissors, and glue. You can start by cutting out basic shapes for the body and limbs. Don’t forget to add those playful details like eyes and silly mouths. You can even mix and match colors to create unique designs!
What’s great about these paper monsters is that they allow for endless creativity. Each monster can have its own personality. You can make them dance, jump, or just hang out with their paper friends. Incorporate different elements like trees or little houses to set up a fun scene.
These lively paper creations fit perfectly into a variety of projects, whether you want to decorate a room or create an interactive display for kids. So grab your materials and start crafting these delightful paper monsters today!
Charming Paper House Models

Imagine a cozy little neighborhood made entirely of paper. These charming paper house models bring a whimsical touch to any space while being surprisingly easy to create.
The image shows a delightful scene where colorful houses stand proudly on a curved path. Each house has its unique design and color, with inviting windows and cheerful rooftops. Surrounding them are small trees and playful details that add to the charm.
Creating these paper houses can be a fun afternoon project. All you need are some basic supplies: colored paper, scissors, a glue stick, and a little imagination. Start by choosing your favorite house design and sketching it out. Cut out the shapes, then fold and glue them together. You’ll see how quickly a simple sheet of paper transforms into a lively little home.
This activity is not just for adults; kids can join in too! It’s a great way to encourage creativity and develop fine motor skills. Plus, the result is a delightful decoration you can proudly display.
Vibrant Paper Collages
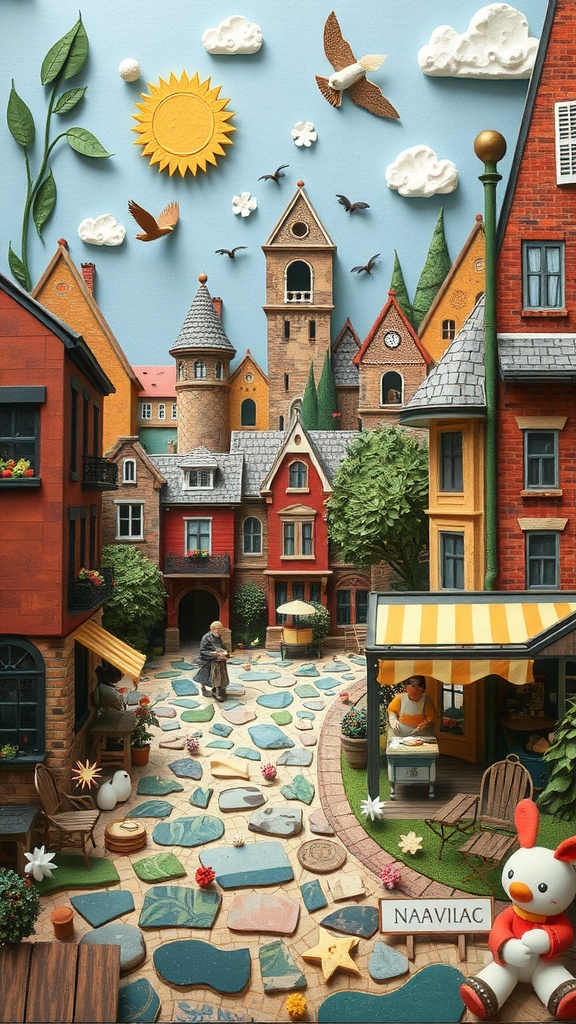
When you think about paper crafts, you might imagine simple cutouts. But vibrant paper collages, like the one in this image, take it to a whole new level. This artwork features a charming town scene, complete with colorful houses, a lively market, and playful elements like birds and a smiling character. Each detail is crafted with care, making it a feast for the eyes.
The bright colors and textures bring a sense of life to the scene. Notice how the sun shines down on the houses, creating a warm and welcoming atmosphere. The cobblestone path adds depth, inviting viewers to imagine walking through this delightful setting. This collage shows that you can create complex looks using simple materials.
To make your own paper collage, you don’t need fancy supplies. Start with colored paper, scissors, and glue. Gather various textures, like cardboard for depth or thin paper for delicate details. Lay out your design and start layering. It’s all about playing with shapes and colors to bring your vision to life. You’ll see that what looks complicated can be broken down into fun and easy steps.
Fun Paper Robots

Let’s dive into the world of paper robots! These little creations are not only colorful but also simple to make. They can be a delightful addition to your crafting adventures. You can create your own unique designs or follow templates that are widely available.
In the image, you can see two cheerful paper robots standing proudly. One is bright orange and the other is a mix of white and blue, showcasing how you can play with colors and styles. Each robot has distinct features like buttons, eyes, and even fun antennas. This makes them look lively and full of personality!
Making paper robots can be a fun project for both kids and adults. You just need some cardstock, scissors, and glue. Start by cutting out the different parts of the robot, like the head, arms, and legs. Once cut out, you can assemble them using glue, attaching each piece carefully to create your 3D effect.
After crafting, you can personalize your robots. Add stickers, drawings, or other decorations to give them character. These paper robots can also be used as decorations or toys. They are sure to bring a smile to anyone who sees them!
Festive Paper Party Hats

These festive paper party hats are the perfect touch for any celebration. Picture a colorful array of hats, each one boasting bright colors and playful patterns like polka dots and stars. They instantly bring a cheerful vibe to any party.
Making these hats is simple, so don’t worry if you’re not a crafting expert. You just need some colorful paper, scissors, and glue. Cut the paper into a circle, slice it into a spiral, and then shape it into a cone. Secure it with glue. You can even add small decorations on top for that extra flair!
These party hats look complicated but are easy to whip up in no time. They are perfect for birthdays, holiday gatherings, or any festive occasion. Plus, they can be customized to match your party theme. Get creative with colors and patterns!
Creative Paper Fridge Magnets

Who knew that a simple fridge could turn into a canvas for creativity? These paper fridge magnets might look like they took hours to make, but the truth is, they are easy to whip up!
The image showcases a charming assortment of colorful magnets in various shapes. You can spot stars, hearts, clouds, and even a little house, all made from paper. The vibrant colors and playful designs add a touch of joy to any kitchen.
To make your own, all you need are some basic materials: colorful paper, scissors, and adhesive magnets. Start by cutting out your favorite shapes. Get creative! You can even layer papers to add depth. Once you have your shapes ready, simply glue a small piece of adhesive magnet to the back. Voila! You have a unique and cheerful way to hold up your grocery lists or kids’ art on the fridge.
This project is not just about craft; it’s also a fantastic way to brighten up your space. Plus, it’s a fun activity to do with family or friends. Gather everyone around the table, and let the creativity flow!
Innovative Paper Picture Frames

Picture frames may seem straightforward, but transforming them into a 3D masterpiece is where the fun begins. The image showcases a vibrant orange frame adorned with colorful paper flowers and leaves, adding a lively touch to any space. It’s a simple yet eye-catching way to display your favorite memories.
The process of creating these frames is not as tricky as it looks. You can start with a basic frame design, then use various colored paper to cut out floral shapes. Layering these cutouts adds depth and dimension, making your frame feel alive.
As you arrange your flowers around the edges, consider mixing different colors and shapes to bring out your creativity. This project is not only enjoyable but also a delightful way to personalize your décor. Whether it’s for a family photo or a cherished memento, a crafty frame can truly enhance the presentation.
Delightful Paper Sea Creatures

Creating delightful paper sea creatures can be a fun and rewarding experience, even if it looks complicated! This vibrant underwater scene features colorful fish and a playful octopus, all made from paper. Each creature has its own unique style, bringing a lively touch to your crafting session.
To make these charming characters, gather some colored paper, scissors, and glue. Start by cutting out different shapes for each creature. For the octopus, you can roll strips of paper into tentacles for a 3D effect. The fish can be created by cutting out simple oval shapes and adding fins.
Once you’ve crafted your sea life, arrange them on a blue backdrop that resembles the ocean. You can also add some paper coral and plants to enhance the scene. This project not only sparks creativity but also offers a wonderful opportunity to learn about marine life while having fun with paper.
Imaginative Paper Cities

Creating a paper city is a fun and engaging way to explore your creativity. This image showcases a colorful cityscape made entirely from paper, featuring various buildings, a charming little car, and even some trees and flowers. Each structure has its own unique design and color, adding a vibrant touch to the scene.
Making your own paper city might sound complex, but it’s much simpler than you think. You can start with templates or create your own designs. Gather some colorful paper, scissors, and glue, and you’re ready to go. Cut out different shapes for buildings, using rectangles for houses and tall triangles for skyscrapers.
Don’t forget the details! Adding little elements like windows, doors, and even tiny people can bring your city to life. You could also incorporate parks and streets to make the scene more interactive. With just a bit of time and imagination, you can transform basic paper into a lively and imaginative paper city that showcases your artistic flair.
Charming Paper Fairies

Creating charming paper fairies is a delightful way to bring a touch of magic into your home. These little creations may look intricate, but they are quite simple to make, which makes them perfect for crafters of all ages.
In the image, you can see two elegant paper fairies dancing amidst a whimsical forest backdrop. Their delicate wings and graceful poses make them stand out, while the surrounding trees and flowers add a natural charm. This enchanting scene invites you to imagine a fairytale world right at your fingertips.
To create your own paper fairies, start by gathering some basic materials: colorful paper, scissors, and glue. Cut out fairy shapes, including the body, wings, and any details you’d like to add. Once you have all the pieces, glue them together and embellish them with markers or glitter for an extra touch of sparkle. Arrange them on a decorative base, perhaps surrounded by flowers or other elements from nature, just like in the image.
This fun project not only sparks creativity but also makes for lovely decorations. Whether for a birthday party, a fairy-themed event, or just to brighten up your living space, these paper fairies are sure to bring joy!