Turn your cherished memories into stunning pieces of art with DIY memory keepsakes! This guide will show you creative and easy ways to transform your favorite photos into unique decor that reflects your personality and tells your story. Get ready to make your memories unforgettable!
Designing a Photo Book to Chronicle Events
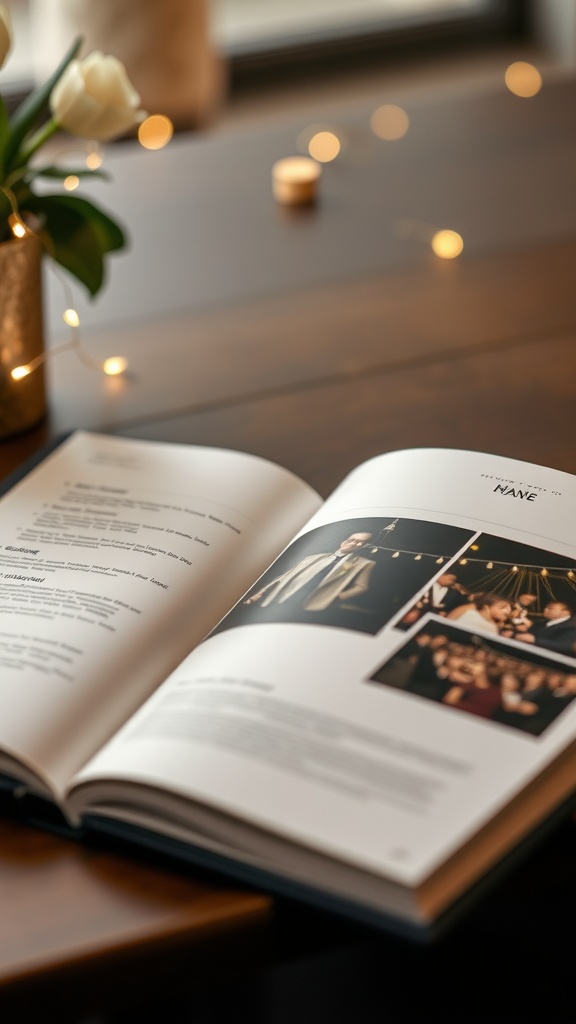
Creating a photo book is a fun way to keep memories alive. In the image, we see a beautifully designed book open to a spread filled with photos and text. It captures special moments and tells a story, making it perfect for chronicling any event.
The layout in the book makes it easy to connect images with the words that describe them. You can arrange photos from birthdays, weddings, or family gatherings in a way that flows nicely. The soft lighting around the book and the flowers add warmth to the setting, inviting you to dive into those cherished memories.
When designing your photo book, think about themes or stories you want to highlight. You can use captions, dates, and fun anecdotes to make each page more engaging. Having a clear focus will not only make the book visually appealing but also make it more meaningful.
Crafting a Customized Photo Calendar

A customized photo calendar is a wonderful way to celebrate memories throughout the year. Imagine flipping through each month and seeing your favorite moments captured perfectly. The image here showcases a calendar format from 2017, beautifully displaying photos from each month alongside the days of the week. This setup offers a nostalgic glimpse into the past, making it a fantastic keepsake.
Creating your own photo calendar is simple. Start by selecting your favorite images. These can be from family trips, special events, or everyday moments that bring a smile. Once you have your photos, choose a layout that suits your style. You can go for a clean look with one photo per month or a collage style that showcases several images at once.
Next, find a printing service that specializes in custom calendars. Many of these services allow you to personalize each month with captions or special dates. Consider adding birthdays, anniversaries, or other significant events to make it even more special. Once printed, your calendar will not only serve as a functional item but also a piece of art that tells your story.
Framing Memories in Shadow Boxes

Shadow boxes are a fantastic way to display your favorite photos and keepsakes. This image shows a beautifully arranged shadow box filled with black-and-white photographs of smiling faces and cherished moments. Each photo captures a unique memory, making the box a personal treasure.
The contrast between the dark images and the light wooden frame adds warmth to the display. Decorative elements like flowers and small trinkets complement the photos, creating a layered look that’s visually appealing. The use of different textures, like the woven items and smooth surfaces, makes the arrangement more dynamic.
When creating your own shadow box, think about combining various elements that represent your memories. Mix photos with small objects that hold special meaning. This not only adds depth but also tells a story. Remember, the goal is to celebrate those moments and make them a focal point in your space.
Transforming Photos into Wood Transfers

Creating wood transfers from your favorite photos is a fun way to preserve memories. Imagine turning those snapshots into art pieces that you can display at home. The process is simple and rewarding.
The image shows a lovely wooden texture that serves as a perfect backdrop for your transfers. The natural grain and knots of the wood add character to each piece. It’s this unique quality that makes wood transfers so special.
To start, you’ll need a few supplies like gel medium, your chosen photo, and of course, a smooth piece of wood. Print your photo on regular paper, apply gel medium to the wood, and then place the photo face down. Smooth out any bubbles, let it dry, and then gently rub off the paper to reveal the image. You’ll be left with a beautiful piece of art that captures a moment in time.
This method allows you to create personalized gifts or home decor that truly express who you are. Plus, it’s a fantastic way to repurpose old photos that might otherwise be forgotten.
Creating a Photo Collage Canvas

A photo collage canvas is a fun way to showcase your cherished memories. In the image above, you can see a vibrant collection of photos arranged in a grid. Each picture tells a different story, capturing moments from travel, family gatherings, and playful selfies.
This piece of art not only brightens up a room but also serves as a conversation starter. Friends and family will enjoy looking at the diverse images, reminiscing about the good times.
To create your own collage, start by selecting your favorite photos. Choose a mix that reflects different experiences and emotions. You can go for a specific theme or simply pick what resonates with you the most.
Next, consider the layout. You can arrange the photos in a grid, create a more abstract design, or even spell out a word to personalize it further. Once you have your layout set, use a canvas to display your masterpiece.
Finally, hang your collage on a wall that needs a pop of color. Your photo collage canvas will not only make your space feel more inviting but also keep your treasured memories alive.
Making a Photo Puzzle Keepsake

Creating a photo puzzle keepsake is a fun and heartfelt way to turn your favorite memories into something interactive. Imagine piecing together a beautiful image of a cherished moment, like a family gathering or a special trip. The image showcases a completed puzzle featuring a lovely house, with scattered pieces waiting to be placed. This captures the essence of the process perfectly!
To start, select a photo that brings back good memories. It could be a family portrait, a scenic view, or even a candid shot of your pet. Take it to a service that specializes in custom puzzles, or use online tools that let you create one with ease. Once you receive your puzzle, gather your family or friends to enjoy the experience together.
As you work on assembling the puzzle, stories and laughter often flow, making it a great bonding activity. Plus, once completed, you’ll have a unique work of art that can be displayed or stored as a keepsake. This simple yet creative project turns memories into a tangible experience that everyone can treasure!
Designing a Scrapbook with Personal Touches

Creating a scrapbook is more than just assembling photos; it’s about telling a story. The image shows a vibrant scrapbook filled with personal snapshots and handwritten notes. It captures moments that matter, making it a fantastic way to cherish memories.
Each page is a canvas where photos are paired with playful stickers and heartfelt messages. This layout invites viewers to feel the emotions tied to each picture. You can see how the combination of visuals and words brings memories to life.
Consider using different styles for each page. For example, one can be clean and minimalistic, while another is bursting with color and creativity. Mixing styles keeps things exciting and reflects your personality.
Don’t forget to include little mementos like tickets or doodles. These adds unique touches that make your scrapbook one-of-a-kind. Using various embellishments can turn simple pages into delightful keepsakes.
The key is to let your creativity flow. Don’t worry about perfection—it’s all about what those memories mean to you. So grab your favorite photos and start creating a scrapbook that tells your story in a beautiful, personal way.
Creating a Memory Quilt from Fabric Photos

Turning cherished photos into a memory quilt is a fun and creative way to preserve your favorite moments. The image showcases a beautifully crafted quilt, featuring a patchwork of fabric squares that hold images of scenic views, colorful flowers, and memorable experiences. Each square tells its own story, making the quilt not just a blanket but a collection of memories.
To get started, you’ll need fabric squares printed with your chosen photos. There are various online services that can print images on fabric, allowing you to select the best moments from your collection. Once you have your fabric, gather some basic sewing supplies like thread, a sewing machine, and batting for warmth.
Begin by arranging the squares on the floor to find a layout you love. This step is vital, as you want the quilt to flow well visually. After you finalize the arrangement, start sewing the squares together row by row. Once you have your top layer assembled, attach the batting and backing fabric, and sew all layers together.
Finally, add a border to give the quilt a polished look. You can choose a fun fabric that complements the images. Your finished memory quilt will not only keep you warm but also serve as a stunning piece of art for your home, celebrating the memories you’ve captured.
Using Photo Magnets to Decorate

Photo magnets are a fun and easy way to showcase your favorite memories right on your fridge. This image displays a colorful assortment of photos magnetically attached to a white refrigerator, each capturing a moment filled with joy. From family gatherings to candid shots, these magnets bring a lively touch to any kitchen.
Creating your own photo magnets is simple. Start by selecting your favorite images. You can print them in various sizes to fit different magnet bases. Next, adhere the prints to magnetic sheets, which can be cut to size. Once they’re ready, stick your magnets on the fridge for a personal touch!
This method doesn’t just add color; it also turns your kitchen into a gallery of memories. Every time you grab a snack or drink, you’re reminded of those special moments. It’s a great conversation starter and a lovely way to keep your cherished memories in sight.
Crafting Personalized Greeting Cards

Creating personalized greeting cards is a fun way to express your feelings. The image shows a delightful assortment of cards, each featuring a unique design and a cherished photo. You can see a smiling child, festive themes, and cheerful messages that bring warmth and joy.
These cards are perfect for any occasion, be it birthdays, holidays, or just a friendly hello. Adding your own touch makes them special. You can choose photos that hold meaning, making the card a true keepsake.
Gather some basic supplies like cardstock, scissors, and your favorite photos. Then, let your creativity flow. Use bright colors and playful drawings to match the vibe of the occasion. With just a bit of effort, you can turn simple materials into heartfelt treasures.
Transforming Photos into Art Prints

Turning your favorite photos into stunning art prints is a fun way to celebrate memories. This image showcases a beautiful arrangement of photographs displayed on an easel, surrounded by framed pictures on the wall.
The collection features a mix of landscapes, cityscapes, and personal portraits. Each photo captures a moment, telling its own story. The easel adds a touch of elegance, making the display feel like a mini-gallery in your home.
Using high-quality prints enhances the colors and details, ensuring that each piece stands out. Whether it’s a serene sunset or a joyful family moment, transforming your photos into art creates a personal connection.
Consider adding captions or quotes to personalize your pieces even more. This creative project is perfect for home decor or as thoughtful gifts for friends and family.
Making a Memory Jar filled with Photos

A memory jar is a great way to celebrate special moments in your life. The image showcases a beautifully arranged glass jar filled with colorful photos. Each picture tells a story, making it perfect for reminiscing on memories.
The jar is not just functional but also decorative. With vibrant ribbons wrapped around it, it adds a touch of charm to any room. The photos are placed in a fun and casual manner, making it inviting and easy to interact with. You can pull out a photo and share a memory with friends and family.
To create your own memory jar, start by collecting your favorite photos. You can use a mix of printed images and rolled-up notes that describe the moments. Once you have your items, simply place them in a jar. Tie some colorful ribbons around the jar for an extra flair. This makes for a unique piece of art that celebrates your life.
Creating 3D Photo Displays

Turning your favorite photos into stunning 3D displays adds a unique touch to your home. Imagine walking into a room where images leap off the walls, capturing moments and memories. This can be done simply with a bit of creativity and the right materials.
The image shows a gallery-like setup filled with various framed photos, showcasing landscapes and portraits. Each frame is positioned thoughtfully to create a captivating visual experience. A small table in the center with flowers adds a personal touch, making the space feel warm and inviting.
To create a similar display, start by selecting your favorite photos. Use various sizes and orientations of frames to enhance the 3D effect. Mixing textures, like wooden and metallic frames, can also add depth. Don’t forget to add a few decorative elements, like plants or small sculptures, to create a more dynamic environment.
Lighting plays a key role too. Soft spotlights or natural light can highlight specific pieces and create a cozy atmosphere. Experiment with different arrangements until you find one that feels just right. The goal is to make your memories not just visible, but unforgettable.
Designing a Photo Wall Mural

Creating a photo wall mural is a fun way to celebrate memories. The image showcases a living room with a stunning collage of photographs on the wall. Each picture tells a story, capturing special moments shared between friends and family. This arrangement not only personalizes the space but also serves as a conversation starter for guests.
To design your own mural, start by selecting photos that resonate with you. Mix and match different sizes for an artistic touch. In the image, we can see a variety of sizes and layouts, which adds depth to the display. It’s all about showcasing your journey in a creative way.
The circular globe centerpiece in the mural adds an interesting focal point. You might want to consider a similar element that reflects your interests or travels. This creates a cohesive look while highlighting your unique story.
Lastly, arranging the photos in a way that feels balanced is key. Look at the image for inspiration; the layout is well thought out. Whether you prefer a grid style or a more eclectic approach, make sure it feels right for your space.
Creating a Themed Photo Display

A themed photo display adds a personal touch to any space, showcasing memories in a fun way. The image captures a vibrant photo exhibit, titled ‘SEASON,’ displayed outdoors. The backdrop features a warm, brown fabric, perfectly complementing the autumn colors of the surrounding trees.
This display showcases a variety of photographs, each telling its own story. The arrangement includes scenic landscapes, portraits, and candid moments. These images capture the essence of seasonal changes and personal experiences, inviting viewers to reflect on their own memories.
Using bold letters and a striking maple leaf, the title draws attention, creating a focal point that unifies the theme. Whether you want to highlight family gatherings, travel adventures, or everyday moments, a themed display can be a beautiful way to celebrate these memories.
To create your own themed photo display, think about the colors and types of photos you want to include. Choose a theme that resonates with your experiences, and don’t shy away from mixing different sizes and styles. This adds depth and interest to your layout, making your display even more engaging.
Making a Personalized Photo Clock

A personalized photo clock is a wonderful way to keep memories alive while also having a functional piece of art. The image shows a beautifully designed clock that features various photos attached around its face. Each number is paired with a different snapshot, creating a collage that tells a story.
Creating your own photo clock is simple and enjoyable. Start by selecting your favorite photos. These could be fun moments, family gatherings, or even landscapes that make you smile. Choose images that resonate with you and will look great in a round format.
Once you have your photos, print them out in suitable sizes. Ideally, they should fit nicely between the numbers on the clock face. You can use a basic wall clock as your base. Just remove the glass cover and carefully stick your printed photos onto the clock face.
After arranging the photos to your liking, reassemble the clock. Make sure the clock hands can move freely without hitting any of the pictures. Hang it in a spot where you can admire it daily. This personalized clock will not only tell you the time but also remind you of special moments!
Turning Photos into Personalized Stationery

Have you ever thought about how special it is to receive a handwritten note? Now, imagine that note featuring your favorite memories. This is where turning your photos into personalized stationery comes into play.
The image shows a beautiful collection of stationery items. Here, you can see various envelopes, each with its own unique design, alongside printed photos. This setup invites creativity and personal flair.
Using your photos, you can create custom cards, invitations, or thank-you notes. Whether it’s a cherished family photo or a snapshot from a memorable outing, these images can bring a personal touch to your stationery.
Don’t hesitate to explore different styles. You can choose floral designs, minimalistic looks, or even elegant scripts. The options are endless! By adding a personal touch, your stationery becomes a unique reflection of you, perfect for any occasion.
Creating a Memory Tree with Photos

A memory tree is a fantastic way to showcase your favorite moments. Imagine a tall, slender tree adorned with your cherished photos. This unique piece not only serves as decor but also tells a story of your journey through life.
In the image, you can see a beautifully crafted tree, complete with branches hanging with pictures. Each photo can represent a special memory or milestone. The tree has a natural look, with a sturdy trunk and branches reaching out, creating a welcoming vibe.
You could easily recreate this at home. Start by finding a tree branch or even a small potted tree. Gather your favorite photos and use colorful string or clips to hang them from the branches. You can personalize it further by adding decorative items, like small ornaments or a clock, to make it even more special.
This memory tree will not only brighten your space but also spark conversations. Every time someone visits, they can admire the photos and share their thoughts. It’s a simple yet meaningful way to keep memories alive.
Crafting Photo Coasters for Memories

Creating photo coasters is a fun way to turn your cherished pictures into practical art. The image shows several coasters with vibrant photos, resting on a stylish wooden table. These coasters not only protect your surfaces but also spark conversation and evoke memories.
To make your own, start by selecting the images that mean the most to you—whether they’re family portraits, vacation snapshots, or candid moments with friends. Just print them out in the right size for your coasters. You can find blank coasters at craft stores or online, usually made from wood or cork, which work great for this project.
Once you have your images ready, use a strong adhesive to attach them to the coasters. After that, seal them with a waterproof clear coat to ensure they’re durable and easy to clean. Let everything dry completely before using them. In no time, you’ll have beautiful coasters that not only serve a purpose but also add a personal touch to your home.
Designing a Family Heritage Wall

A family heritage wall is a beautiful way to celebrate your roots and share memories. The image shows a striking family tree design that serves as the centerpiece of this wall. It features various family photos, each framed and displayed creatively. The tree branches reach out, symbolizing family connections and history.
The use of different frames adds an artistic touch, making each photo stand out. This approach invites viewers to explore the family’s story. Including names and dates can add context, helping everyone understand the legacy behind each face.
A small table below the wall can hold keepsakes or additional family mementos, adding more personal flair. It’s a great spot for visitors to stop and reflect on the family history. Creating a space like this turns a simple wall into a conversation starter, making it a cherished part of your home.
Making a Photo Banner for Celebrations

Creating a photo banner is a fun and meaningful way to celebrate special moments. Picture long strands of colorful photos hanging between trees, capturing memories that bring smiles. It’s more than just decoration; it tells a story. Each photo represents a cherished event, shared laughter, or an unforgettable day.
Gather your favorite images, then print them out in a uniform size. You can use a mix of styles, like candid shots or group pictures, to add variety. Once you have your photos ready, clip them onto a sturdy string or ribbon. This simple design is not only easy to make but also creates a warm and inviting atmosphere for any gathering.
Consider using colorful clothespins or clips to enhance the look. Bright colors can tie in with the theme of your event, adding a festive touch. Hang the banner in a spot where guests can appreciate it, like near a photo booth or food table. It’s a perfect backdrop for capturing new memories alongside the old ones!
As the event unfolds, guests will enjoy reminiscing over the moments displayed. This DIY project not only beautifies your space but also sparks conversations and laughter, making every celebration more personal and engaging.
Designing Photo-Embedded Magnets

Creating photo-embedded magnets is a fun way to keep your memories close. The image shows a lovely display of photos arranged in a simple, clean layout. Each magnet showcases different moments captured in time, making them perfect conversation starters.
Start by selecting your favorite photos. You can choose images from travels, special events, or everyday moments that bring a smile. Once you have your pictures ready, it’s time to turn them into magnets.
There are many ways to create these keepsakes. You can use adhesive magnet sheets, which allow you to easily attach your photos. Cut the sheets to the size of your images and stick them on. Another option is to use small round magnets along with your photos. Just glue the magnets to the back of each picture.
Finally, consider how you’ll display your magnets. Using a magnetic board or a simple metal sheet can create an eye-catching display. This technique not only makes your fridge look more appealing but also allows you to switch out photos whenever you want.
Creating a Personalized Photo Recipe Book

Turning your cherished family recipes into a beautiful photo recipe book is a fantastic way to preserve memories. In the image, you see an open book filled with delightful recipes and heartwarming family photos. Each page tells a story, blending flavors with faces.
Start by selecting your favorite family recipes. Gather photos of family gatherings and meals to accompany each recipe. This adds a personal touch, making it more than just a cookbook.
Next, organize the recipes. You might want to group them by type, like appetizers, main courses, or desserts. Include anecdotes or special memories tied to each dish, so it feels like a warm hug every time you flip through the pages.
Once you have your recipes and photos ready, you can choose a layout. Use a simple design that showcases the images alongside the text. Don’t forget to add some decorative elements, like borders or embellishments, to make it visually appealing.
Finally, consider printing your book. There are many online services that allow you to create custom photo books. Choose high-quality materials to ensure it lasts through the years. This personalized photo recipe book will not only be a treasure for you but also a cherished gift for family members.
Crafting a Memory Quilt from T-Shirts

Creating a memory quilt from old T-shirts is a fun and meaningful project. This quilt allows you to cherish memories associated with each shirt. Whether they represent a favorite band, a funny event, or a special occasion, these shirts have stories to tell.
In the image, you can see a vibrant quilt assembled from various T-shirts. Each square features unique designs and colors, showcasing different memories. The layout is playful and inviting, making it a perfect showcase for your treasured items.
To start your own quilt, gather T-shirts that hold special meaning. Lay them out to see how they fit together. You can cut the shirts into squares or rectangles, depending on your desired design. Then, sew them together, either by hand or with a sewing machine. Make sure to use strong thread to ensure durability.
Once completed, your quilt will not only be a cozy blanket but also a beautiful piece of art filled with memories. It will be a great conversation starter, reminding you and your loved ones of good times shared.
Making a Photo Scrapbook with Kids

Creating a photo scrapbook with kids is a fun way to encourage creativity. In the image, two little girls are happily working together. One girl is using a yellow marker to draw on a photo book, while the other is carefully choosing how to arrange the pictures. The colorful setup around them adds to the excitement.
Having a variety of supplies like markers, stickers, and colorful papers makes the process even more enjoyable. These materials help children express themselves and bring their ideas to life. Don’t forget to include their favorite photos and memories!
Working on a scrapbook together not only strengthens bonds but also teaches kids about organization and storytelling. They get to choose what photos to include and how to layout the pages. This makes their scrapbook unique and personal.
Encourage kids to share stories related to each photo they pick. This activity will spark their imagination and help them reflect on happy moments. It’s a delightful way to create lasting keepsakes that you can revisit in the years to come.
Creating a Personalized Photo Lamp

Transforming photos into art is a fun way to keep memories alive. One unique project is creating a personalized photo lamp. This lamp can add a special touch to any room while showcasing your favorite images.
Imagine a lamp that features a serene landscape, like trees against a golden background. The soft glow from the light can elevate the mood, making your space feel cozy and inviting. You can even use a photo of a special moment—perhaps a family vacation or a beloved pet. This not only lights up your home but also sparks conversation.
Making a photo lamp is easy. Start by choosing a lamp base that matches your decor. Next, select a lampshade that can display your image. You can print your photo on fabric or use a printable lampshade kit. Attach the image securely, ensuring it’s positioned well to catch the light. Finally, assemble the lamp and switch it on. You’ll have a unique piece of decor that holds precious memories!
Making a Memory Photo Box

Creating a memory photo box is a lovely way to cherish your favorite moments. Picture a beautiful box, its lid slightly ajar, revealing a glimpse of treasured photos inside. Each photograph tells a story, capturing laughter, smiles, and special moments that can easily be forgotten over time.
Choose a box that fits your style—something elegant or fun. You can decorate it with stickers, washi tape, or even fabric to make it more personal. Once you have your box ready, gather your favorite photos. These could be from family gatherings, vacations, or even candid shots of everyday life.
Arrange the photos in the box, perhaps grouping them by occasion or year. You could also include little notes or mementos alongside the pictures. This adds a personal touch and brings back memories every time you open it.
Place your memory photo box somewhere special in your home. It can be a conversation starter when friends visit. Plus, it’s a fantastic way to keep those cherished moments alive and close at hand.
Creating a Family Yearbook with Photos

Creating a family yearbook is a wonderful way to capture memories and share them with loved ones. The image shows an open yearbook filled with photos of family members, displaying smiles and moments that represent the shared experiences of a family. This kind of keepsake not only highlights special occasions but also everyday moments that matter.
To start, gather all your favorite photos from the past year. You might include birthdays, holidays, or even spontaneous gatherings. Once you have your photos, you can organize them by month or event. This helps tell a story throughout the year.
Consider adding captions or funny anecdotes next to photos. It gives context and makes flipping through the pages even more enjoyable. A little personal touch, like a handwritten note, can make the yearbook feel special.
Finally, choose a layout that speaks to your family’s style. Some prefer a clean look with minimal text, while others enjoy a collage of memories filled with stories. Either way, the goal is to create a keepsake that everyone will cherish for years to come.
Crafting a Personalized Photo Game

Creating a photo game is a fun way to turn your cherished memories into an engaging experience. In the image, we see a colorful game board featuring various photos and game pieces. Each photo represents a moment that can spark conversation and laughter among players.
Start by choosing your favorite photos. These can be family gatherings, vacations, or any special events. Next, use these images as game squares, where players can land on a photo and share a story connected to it. This not only makes the game entertaining but also builds bonds as players reminisce.
You can personalize the game pieces too! Pick colors that represent each player or use small tokens that hold significance. As the game progresses, players will find themselves laughing and sharing memories, making every moment memorable.
Finally, make sure to have some fun challenges or questions for players to answer when they land on special squares. This adds an element of surprise and keeps everyone engaged. With a personalized photo game, every session will feel unique!
Designing a Photo Advent Calendar

Creating a photo advent calendar is a fun way to celebrate the countdown to a special occasion. The image shows a beautifully arranged calendar featuring photos of loved ones, adding a personal touch to each day. It captures the joy and warmth of the season, making it a delightful project.
Start by choosing your favorite photos. You might want to select images from past holidays, family gatherings, or other memorable moments. Once you have your photos, print them out in a uniform size. This will keep everything looking neat and organized.
The red backdrop in the image adds a festive flair, setting the perfect tone for your calendar. You can use colorful paper or even a decorated board to display the photos. Arrange them in a grid or a fun pattern, and make sure to number each photo to correspond with the days leading up to your celebration.
Don’t forget to add decorations! Sprigs of pine, ornaments, or fairy lights can enhance the visual appeal. They bring the whole concept together and create a cheerful atmosphere. Every time someone opens a photo, they’ll be greeted with fond memories, making the experience extra special.
Turning Photos into Custom Wall Art

Creating custom wall art from photos is an easy and rewarding project. The image shows a beautiful collection of framed photos displayed on a clean wall. Each frame showcases unique moments, turning ordinary pictures into stunning decor.
The arrangement mixes different sizes and styles of frames, adding character to the space. This layout invites viewers to explore each piece, making it a conversation starter.
Incorporating a plant and a stylish chair into the setting enhances the overall aesthetic. The combination of nature and art creates a cozy atmosphere, perfect for any room in the house.
To start your project, gather your favorite photos and choose frames that suit your style. You can even experiment with black and white versus color images for added contrast. Once framed, arrange them on the wall until you find the perfect layout. This DIY project not only personalizes your space but also preserves cherished memories.