-
×
 Red Rose Flower Bracelet
$19.99
Red Rose Flower Bracelet
$19.99
 Red Rose Flower Bracelet
 Ready to unleash your inner artist without breaking the bank? Painting like a pro doesn’t require fancy tools or materials; you can create beautiful art using everyday household items. From kitchen utensils to old rags, discover how these common objects can help you achieve stunning results while keeping the fun and creativity alive. Let’s dive in and turn your home into a paint studio!
Saran Wrap for Smooth Finishes
Using Saran wrap in your painting process can lead to some interesting effects, as shown in the image. Here, the vibrant swirl of blues and greens is enhanced by the texture created with plastic wrap. It’s a simple technique that can bring depth and dimension to your artwork.
To get started, you’ll want to apply your base layer of paint on a canvas or any surface you choose. Once you’ve painted, gently lay a piece of Saran wrap over it while the paint is still wet. Be careful not to press too hard; you want to create texture without completely mixing the colors. This will give you the unique patterns seen in the image.
After letting it sit for a few moments, carefully peel the wrap away. You’ll reveal beautiful lines and shapes that make the painting look dynamic and fresh. This technique is perfect for beginners and experienced artists alike, providing a fun way to experiment with color and texture!
Eggshells for Unique Patterns

Using eggshells in your painting can add a special touch to your artwork. The texture of the crushed shells creates interesting patterns that are hard to replicate with traditional brushes.
To start, collect some clean eggshells and let them dry. Once they’re ready, crush them into small pieces. You can use a rolling pin or simply crush with your fingers. The goal is to achieve a variety of sizes for more dynamic patterns.
Next, apply a base coat of paint on your canvas. While it’s still wet, sprinkle the crushed eggshells over the surface. Press them gently into the paint to ensure they stick. As the paint dries, you’ll notice unique designs emerging that will give your painting a distinct character.
This technique not only enhances the visual appeal but also adds a tactile element to your art. It invites viewers to engage with the piece up close. Experiment with different colors and placements to see what works best for you!
Using Coffee Grounds for Earthy Shades

Coffee grounds are a fantastic, eco-friendly option for adding depth to your artwork. They bring a rich, earthy tone that can really enhance your painting. In the image, you can see coffee grounds splattered across a canvas, creating an organic feel that’s hard to achieve with traditional paints.
To get started, simply gather some used coffee grounds. Make sure they’re dry to avoid any mold. You can mix the grounds with a little water to create a paste or sprinkle them directly onto your canvas for texture. The result is a unique blend of browns and tans that can mimic soil, wood, or even natural landscapes.
One of the best parts about using coffee grounds is the variety of effects you can achieve. For a softer look, mix the grounds with lighter colors. For something bolder, pair them with darker shades. The key is to experiment and have fun!
So next time you enjoy a cup of coffee, think about saving those grounds. They’re not just for compost or your morning brew—they’re a simple, creative tool in your art kit!
Using Salt for Textured Effects

In this section, we’ll explore how salt can be a fun and effective tool for adding texture to your paintings. The image showcases a vibrant canvas with bold colors and splashes, making it a perfect backdrop for experimenting with salt techniques.
To start, you’ll want to apply a layer of wet paint as seen in the bright yellow and pink areas of the image. Once you’ve painted your desired colors, sprinkle salt over the wet paint. The salt will absorb moisture and create interesting patterns as it dries. This technique can add depth and a unique flair to your artwork.
As shown, the contrasting colors of the paint enhance the textured effects created by the salt. You can use different sizes of salt grains for varying results. Coarser salt will create more pronounced textures, while finer salt might blend more subtly into the paint.
After you let the painting dry completely, gently brush off the salt to reveal the cool textures underneath. This method is not only simple but also encourages playful creativity. The bright colors and dynamic patterns in the image can inspire you to try various color combinations and salt applications.
Old T-Shirts as Painting Tools

When it comes to painting, we often think of brushes and sponges, but old t-shirts can be a fun and creative alternative. They are soft, absorbent, and perfect for various techniques. Imagine the vibrant colors splashed all over your canvas, just like in the image. The mix of bold shades and playful drips captures a sense of spontaneity that you can achieve with some simple household items.
Using t-shirts allows you to experiment without the pressure of making mistakes. Whether you’re dabbing, smudging, or wiping, your old clothes can add texture and personality to your artwork. Plus, you won’t have to worry about getting them messy!
If you’re unsure where to start, grab a couple of worn-out t-shirts, cut them into smaller pieces, and use them for different techniques. For instance, you can dab with one piece for soft edges or use another to create bold strokes. Each fabric can give your painting a unique feel, much like the random splashes seen in the artwork shown.
So next time you’re about to toss those old tees, think twice! They can bring a whole new dimension to your painting experience. Embrace the mess and have fun as you channel your inner artist!
DIY Paintbrushes from Nature

Creating your own paintbrushes using items from nature can be a fun and rewarding experience. Look at how many different materials you can use! In the image, you can see a variety of brushes lined up neatly, some made from traditional materials and others crafted from natural elements like leaves. These homemade tools can add unique textures and styles to your artwork.
To make your own paintbrush, start by gathering materials. Look for things like twigs, leaves, or even feathers. For example, a sturdy twig can serve as a handle, while the tip can be dipped in paint to create different strokes. Leaves can also be attached to the ends of sticks, giving you a brush that can produce interesting shapes. The colors displayed on the palette can inspire you as you create.
Once you have your materials, simply attach them to a stick or a pencil with string or glue. Make sure everything is secure so it can handle the painting process. Test your new brush on a piece of scrap paper to see how it performs. You might find that the textures you create are unlike anything you can achieve with traditional brushes.
Using DIY paintbrushes from nature not only enhances your painting experience but also connects you with the environment. It’s a wonderful way to explore your creativity while being resourceful. So grab some items from your backyard and start painting!
Creating Texture with Sponges

Using sponges in your painting can transform a simple canvas into a lively work of art. The image showcases vibrant colors and playful shapes, highlighting the creative potential of household items like sponges.
Start by selecting your colors. In the image, you can see a mix of pinks, greens, and yellows, which create a fun and dynamic atmosphere. When using a sponge, dip it into your paint and press it onto the canvas to create textured patterns.
For added depth, consider layering different colors. You can see how overlapping hues in the image adds complexity and visual interest. Ensure to let each layer dry before adding another to avoid muddying the colors.
Experiment with different sponge shapes. A round sponge will give you soft circles, while a rectangular one can create more structured lines. The playful shapes in the image, like the starbursts and animal silhouettes, demonstrate how varied textures can enhance your painting.
Don’t forget to have fun! Art is about expression, and using sponges allows for a relaxed approach to creativity. Let your imagination run wild, just like the colors and forms in the picture.
Household Items for Stencil Making

Creating stencils at home can be a fun and easy way to add flair to your artwork. Just look at the arrangement in the image: colorful paints, brushes, and various materials all set for some creative fun.
You can use items like cardboard, plastic containers, or even old magazines to make your stencils. Simply cut out shapes or patterns that you like. For instance, that playful cat shape near the bottom of the image shows how versatile this method can be.
Next, grab some paint and a sponge or brush. Dip it lightly in paint and dab it over your stencil. In the photo, you can see bright colors splashed around, which adds a lively touch to any project. Remember, the idea is to have fun and experiment with different colors and shapes!
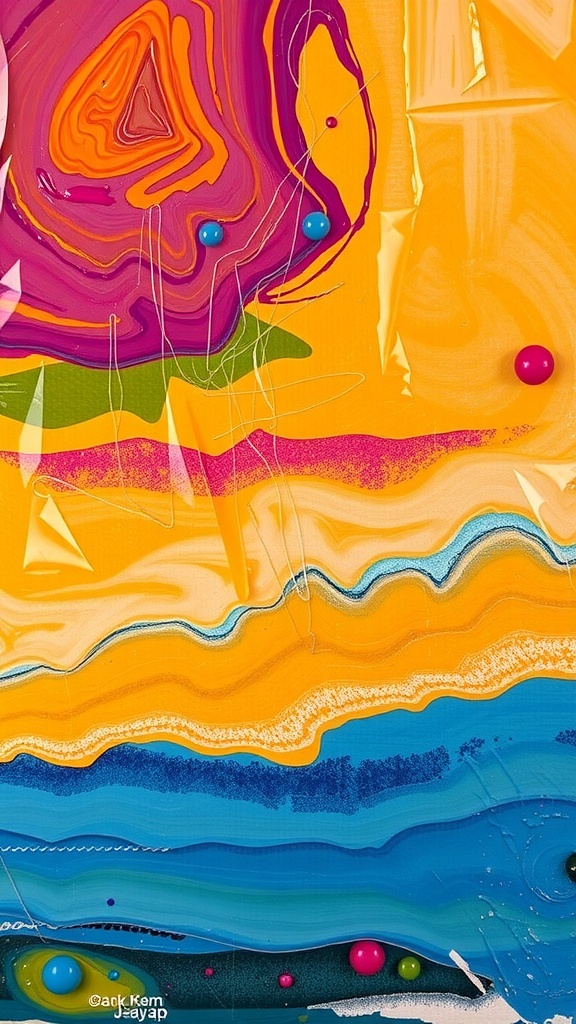
Plastic Bags for Marbled Effects

Using plastic bags for marbled effects in your painting is not only fun but also an easy way to achieve beautiful results. If you look at the image above, you can see how the swirling colors blend together to create a mesmerizing design. The playful mixing of blues, pinks, and oranges brings warmth and vibrancy to the artwork.
To start, gather some plastic bags, your favorite acrylic paints, and a canvas or thick paper. Squeeze different colors of paint directly onto your canvas in random blobs. Then, take the plastic bag and gently press it onto the paint. By swirling the bag around, you can blend the colors together in interesting patterns.
Once you lift the bag, you’ll be surprised at the unique marbled effect that appears. This technique is perfect for anyone, whether you’re a beginner or have some experience in painting. The more you experiment, the more you’ll discover different styles and designs you can create.
Using Vinegar for Paint Texture

Vinegar is not just for salads; it can be a fun addition to your painting supplies! In the image, you can see a colorful canvas with splashes of paint that showcase how vinegar can create unique textures. The vibrant yellows and cool blues interact beautifully, making the overall piece interesting to look at.
To use vinegar for texture, start by mixing it with your paint. Just a small amount can alter the consistency, giving your strokes a different feel. You can experiment by adding vinegar to both acrylic and watercolor paints. It helps to break down the paint, allowing for fun drip effects and blending opportunities.
Here’s a simple method to try: Take a few tablespoons of vinegar and mix it with your chosen paint. Use a brush or sponge to apply it to your canvas. You’ll notice how it creates bubbles and splatters, similar to what you see in the image. Let your creativity flow as you create layers and textures, making your artwork truly stand out!
Creating Bold Lines with Tape

Kitchen Utensils as Painting Tools

Using kitchen utensils for painting is a fun and creative way to explore art without needing fancy supplies. In the image, you can see a colorful canvas splashed with paint, created using various forks and a spatula. Each utensil adds a unique texture and pattern, showing that you don’t need traditional brushes to make beautiful art.
The forks, with their prongs, leave interesting lines and dots as they drag through the paint. They can create everything from delicate details to bold strokes, depending on how you use them. The spatula adds broader, smoother areas of color that can contrast nicely with the fork marks.
This approach to painting is perfect for those who want to experiment. It’s all about having fun with what you have around the house. You might even inspire your kids to join in, making it a playful family activity. Just grab some paint, a canvas, and your favorite utensils, and see what you can create!
DIY Spray Paint with Household Ingredients

Creating your own spray paint at home can be a fun and easy project. The image shows an assortment of household items you can use to whip up your own colorful spray concoction. You’ll see bottles, containers, and some vibrant powders that catch the eye. This setup is perfect for injecting creativity into your DIY art.
To get started, gather your ingredients. You’ll need a spray bottle, water, and food coloring or liquid paint. You can also use cornstarch or flour for a thicker texture. Each of these items is likely already in your kitchen or cleaning cabinet.
Once you have everything, mix about one part paint to three parts water in your spray bottle. If you want a thicker consistency, add a teaspoon of cornstarch or flour. Give it a good shake until it’s well combined. Now you’re ready to spray!
Using a cardboard or poster board can help contain the mess while you experiment with your homemade spray paint. Don’t forget to use protective gear, especially if you’re working with bright colors. Enjoy the process and let your imagination run wild!
Candles for Wax Resist Techniques

Candles can be a fun and creative tool for your art projects. They help create a unique wax resist effect that adds depth and texture to your paintings. When you use candles, you’ll find that they create beautiful patterns that can’t be achieved with regular paint.
To get started, gather your materials: a few candles, watercolor paper, and some watercolor paints. You can use any type of candle, but those with a harder wax work best. Light the candle and let the wax drip onto the paper in different shapes and designs. This will be where your colors will resist later.
Once the wax has cooled and hardened, grab your watercolor paints. Using a brush, apply your colors over the waxed areas. The beauty of this technique is that the wax will repel the paint, creating interesting contrasts and patterns as the colors spread. Experiment with different colors and brush techniques to see what effects you can achieve.
After your painting dries, you can gently scrape off the wax to reveal the white paper underneath. This will create striking highlights in your artwork. If you want to keep the wax in your piece, just leave it as is for a unique texture. Candles are an easy household item that can elevate your painting game in no time!
Toothbrush Splatter Art

Toothbrush splatter art is a fun and creative way to unleash your inner artist using something you probably already have at home. The image shows a vibrant composition filled with colorful splatters, making it clear that this technique is all about letting loose and having fun.
The toothbrush, with its bristles, acts as a tool for creating those splashes of color. You can use any kind of brush, but the unique texture of a toothbrush adds a playful element to your artwork. Just dip it in your choice of paint and flick it onto the canvas or paper for a burst of energy.
Getting started is simple! Gather some acrylic paints, a few old toothbrushes, and a piece of sturdy paper or canvas. Choose your colors wisely. Bright, bold colors work best to create that eye-catching splatter effect. You can even mix colors to create new shades before applying them.
Once you have your materials ready, it’s all about experimenting. Don’t worry too much about perfection. The beauty of splatter art is in its randomness. Move your wrist and flick the bristles to see how the paint flies. You can control the amount of paint on the brush for different effects and densities. Let your creativity flow, and soon you’ll have a dazzling piece of art!
Creating Backgrounds with Newspaper

Using newspaper for backgrounds can add a unique touch to your artwork. In the image, you see a mix of newspaper articles and colorful illustrations. This combination creates an interesting visual effect that can serve as a backdrop for various painting projects.
To start, gather some old newspapers. Look for pages with different texts and images that catch your eye. You can tear, cut, or arrange them in any way you like. The diversity in fonts and colors will keep your background lively.
Once you’ve arranged the newspapers, glue them down. Make sure you smooth out any wrinkles to keep the surface even. After it dries, you can paint over it, letting sections of the newspaper peek through your artwork.
This technique not only provides texture but also adds depth to your piece. It’s a fun way to recycle materials while unleashing your creativity. Don’t hesitate to experiment with different layouts and colors!
Decorative Patterns with String

Milk Paint for Soft Pastels

Milk paint is a fantastic option for those looking to create soft pastel colors in their artwork. It’s not just about the colors; it’s about the texture and finish that this paint provides. The image shows a creamy, pastel-colored paint that looks inviting and easy to work with. The brush dipping into the paint is a perfect visual representation of how smooth and manageable milk paint can be.
The beauty of milk paint lies in its organic ingredients, making it eco-friendly and safe for indoor use. You can achieve soft, muted tones that blend beautifully together. Whether you’re painting furniture, walls, or canvas, milk paint offers a delicate finish that can elevate your project.
To get started with milk paint, you’ll need a few simple ingredients: milk protein (casein), water, and natural pigments. Mix these together to create a smooth paint. Once mixed, you can apply it with a brush, just like in the image. The key is to layer your colors for depth and richness.
One tip is to experiment with different consistencies. Thicker paint can provide a textured effect, while thinner paint can create a more translucent look. Have fun mixing and matching colors to see what works best for your project!
Using Baking Soda for Volume

Baking soda isn’t just for baking; it’s a handy tool for artists, too! In this image, you see a bowl filled with baking soda sitting on a vibrant, painted palette. The bright colors swirl around it, showcasing the fun potential of mixing materials.
When you mix baking soda into your paint, it adds texture and volume. This can create interesting effects on your canvas. It’s great for achieving a 3D look or for adding some unique flair to your artwork.
To use it, simply take a small amount of baking soda and mix it with your chosen paint. Start with a little; you can always add more if you want more texture. Stir it well to combine. The result is a thicker paint that stands out from the canvas, making your artwork pop!
Creating Shadows with Darker Tints

Shadows can add depth and character to your artwork, making it feel more realistic. In the image, you see a beautifully lit table scene with various objects. Notice how the shadows from the tree branches create interesting shapes on the wall. This is an excellent example of how light and dark can work together.
To create shadows in your painting, start by selecting a base color for your objects. Then, mix in a darker tint of that color to represent shadows. This can be done with household items like food coloring or even leftover paint. The trick is to blend the darker tint subtly, so it enhances your piece without overpowering it.
The orange mug in the image casts a soft shadow, showcasing how darker tints can influence the overall atmosphere. Pay attention to how light interacts with your objects. The areas closest to the light will be brighter, while those further away will need darker tints to show depth.
Experimenting with shadows is a fun way to improve your painting skills. Don’t be afraid to play around with different colors and placements. Shadows can transform a flat image into something more dynamic and engaging.
Incorporating Food Coloring for Bright Colors

When it comes to creating vibrant artwork, food coloring can be your secret weapon. It’s inexpensive and easy to find, making it a perfect choice for anyone looking to brighten their canvas without breaking the bank.
In the image, you can see a burst of colors blending together beautifully. The bright yellows, vivid pinks, and deep blues showcase how powerful food coloring can be. Each color stands out, creating an engaging and lively atmosphere.
To use food coloring effectively, start with a base of white paint. This allows the colors to pop. Mix small amounts of food coloring into your paint to see how the hues develop. You can always add more for a richer shade!
Experimenting is key. Don’t hesitate to mix different colors together. You might discover some unexpected but delightful combinations. As you layer these colors, you’ll see how they interact, creating depth and interest in your artwork.
Remember, the key to painting with food coloring is patience. Take your time, and you’ll see the magic unfold. So grab those kitchen supplies and let your creativity flow!
Utilizing Old Brushes for Whimsical Effects

When it comes to painting, old brushes can be your best friends. The image above showcases a variety of brushes, each with its own unique character, ready to help you create playful and imaginative art. These brushes, some worn and others vibrant, can yield surprising textures and effects on your canvas.
Don’t be shy about using those old brushes that might be collecting dust. The frayed bristles and uneven edges can add a delightful charm to your work. You can experiment with techniques like dabbing, dragging, or even splattering paint. Each brush will give you a different result, making your artwork truly one-of-a-kind.
Try layering colors using your old brushes. Start with a base coat and then add pops of color on top. You can use the thicker brushes for broad strokes and the finer ones for details. This mix creates depth and interest in your painting.
Lastly, don’t forget to have fun! Embrace the imperfections that come with using aged brushes. They can lead to unexpected surprises, turning your artwork into a whimsical masterpiece. So grab those brushes and let your creativity flow!
Using Ice Cubes for a Creative Twist

Who would have thought that ice cubes could be a fun tool for painting? In this image, we see a person ready to take on a creative challenge with colorful drips and splashes around them. The bright reds and deep blacks contrast beautifully with the clear ice, making it a perfect setup for an artistic experiment.
To get started with ice cube painting, all you need are some basic supplies. Grab a few ice cubes, some non-toxic paint in various colors, and a canvas or large sheet of paper. Simply dip the ice cubes into the paint and let the melting action create unique patterns as they glide across your surface.
As the ice cubes melt, they create a beautiful blend of colors, giving each piece a distinct look. You might even want to freeze some paint inside the ice cubes for a burst of color when they melt. Don’t worry about making mistakes; the beauty of this method is in its spontaneity and fun!
When you’re done, you can let your artwork dry completely. What you’ll have is a unique piece that showcases your playful approach to art. So, next time you want to paint, consider using ice cubes for a fresh twist. It’s a playful way to unleash your creativity while having a bit of fun!
Repurposing Lids and Caps for Stamping

When it comes to arts and crafts, creativity knows no bounds. One of the simplest and most fun ways to create patterns on paper or canvas is by using everyday items like lids and caps. Just take a look at the image above, filled with colorful bottle caps and lids. Each one can serve as a unique tool for stamping.
Start by gathering an assortment of caps from beverages, jars, or containers. The variety in shapes and sizes will give you different designs. You can easily paint one side of the cap with your chosen paint color, then press it onto paper or fabric for an instant stamp. This not only adds color but also creates fun, playful patterns.
Feeling adventurous? You can mix and match colors, or even layer stamps for more complexity. This technique is perfect for children and adults alike. Plus, it’s an excellent way to recycle items that would otherwise go to waste. So next time you finish a drink, don’t toss that cap—turn it into an art tool instead!
Incorporating Natural Dyes for Eco-Friendly Art

Using natural dyes to create art not only reduces environmental impact but also connects you to nature. Imagine capturing the vibrant colors of flowers and plants to paint your own masterpiece. In the image above, we see a stunning landscape filled with blooming flowers, mountains, and a warm sun. This scene is reminiscent of the colors you can extract from nature itself.
To get started with natural dyes, consider some common ingredients like beets, turmeric, or spinach. Each one offers unique shades. For example, beets can give you a rich red, while turmeric provides a sunny yellow. Simply chop or mash the ingredients, boil them in water, and strain the liquid to use as your dye. It’s a simple process that yields beautiful results.
Once you have your dyes ready, grab a canvas or some paper and start painting. Don’t worry about perfection; let your creativity flow. The soft colors from your natural dyes can create gentle landscapes, much like the one in the image, with lush greenery and vibrant flowers. Experiment with layering and blending the colors to achieve depth and texture.
By using household items for dyeing, you’re also encouraging sustainable practices. Each piece you create becomes a celebration of nature’s beauty and a step towards eco-friendly artistry. So, gather your ingredients and start creating art that reflects the world around you!